
Setting Up A Keycloak Server For Authenticating To FileMaker: Introduction
Lesson in Brief: What Is Keycloak, Why Use It & Next Steps
Data breaches are already far too common and the IT security industry is ever evolving to combat unauthorized access to systems. So, how can we as FileMaker developers and deployers embrace modern security practices? One way is to utilize an Identity and Access Management solution, such as Keycloak, and in this multi-part series we'll be looking at how to install, configure and connect Keycloak to authenticate users to a FileMaker database.
The Inspiration
Before we begin, we must give credit to Wim Decorte and Steven Blackwell for their relentless pursuit of all things security within the FileMaker platform. Their work in this area has inspired us to write this series, which is intended to further promote how critical security is and provide all FileMaker developers with a step by step guide to up their security game. Quite honestly, we could not have written this series without the white papers and presentations from these two pillars within the FileMaker community and we are indebted to them. Please check out their white papers which you can find here. In particular, as are relevant to this Keycloak series:
- How To Extend oAuth 1.0.0
- OAuth Extensibility Addendum3
- OAuth Extensibility Addendum4 Authentication With ADFS
What Is Keycloak?
Keycloak is an Open Source Identity and Access Management solution. Yes, open source, which means you don't have to pay for it! So, really, there is no excuse not to be trying this out. In essence, what this will allow us to do is centrally manage identities for those logging into our FileMaker database.
The user experience is similar to when there is a "Log in with Google" or "Log in with Microsoft" button on a website. Upon clicking this, the user is sent to a page where they log in with their Google/Microsoft credentials and, if successful, when they are redirected back to the website, it accepts the log in attempt. We're not going into the details of oAuth here but if you're interested in how it works, we did come across this article during our research.
This concept is similar to the External Authentication options we have in FileMaker Server already:
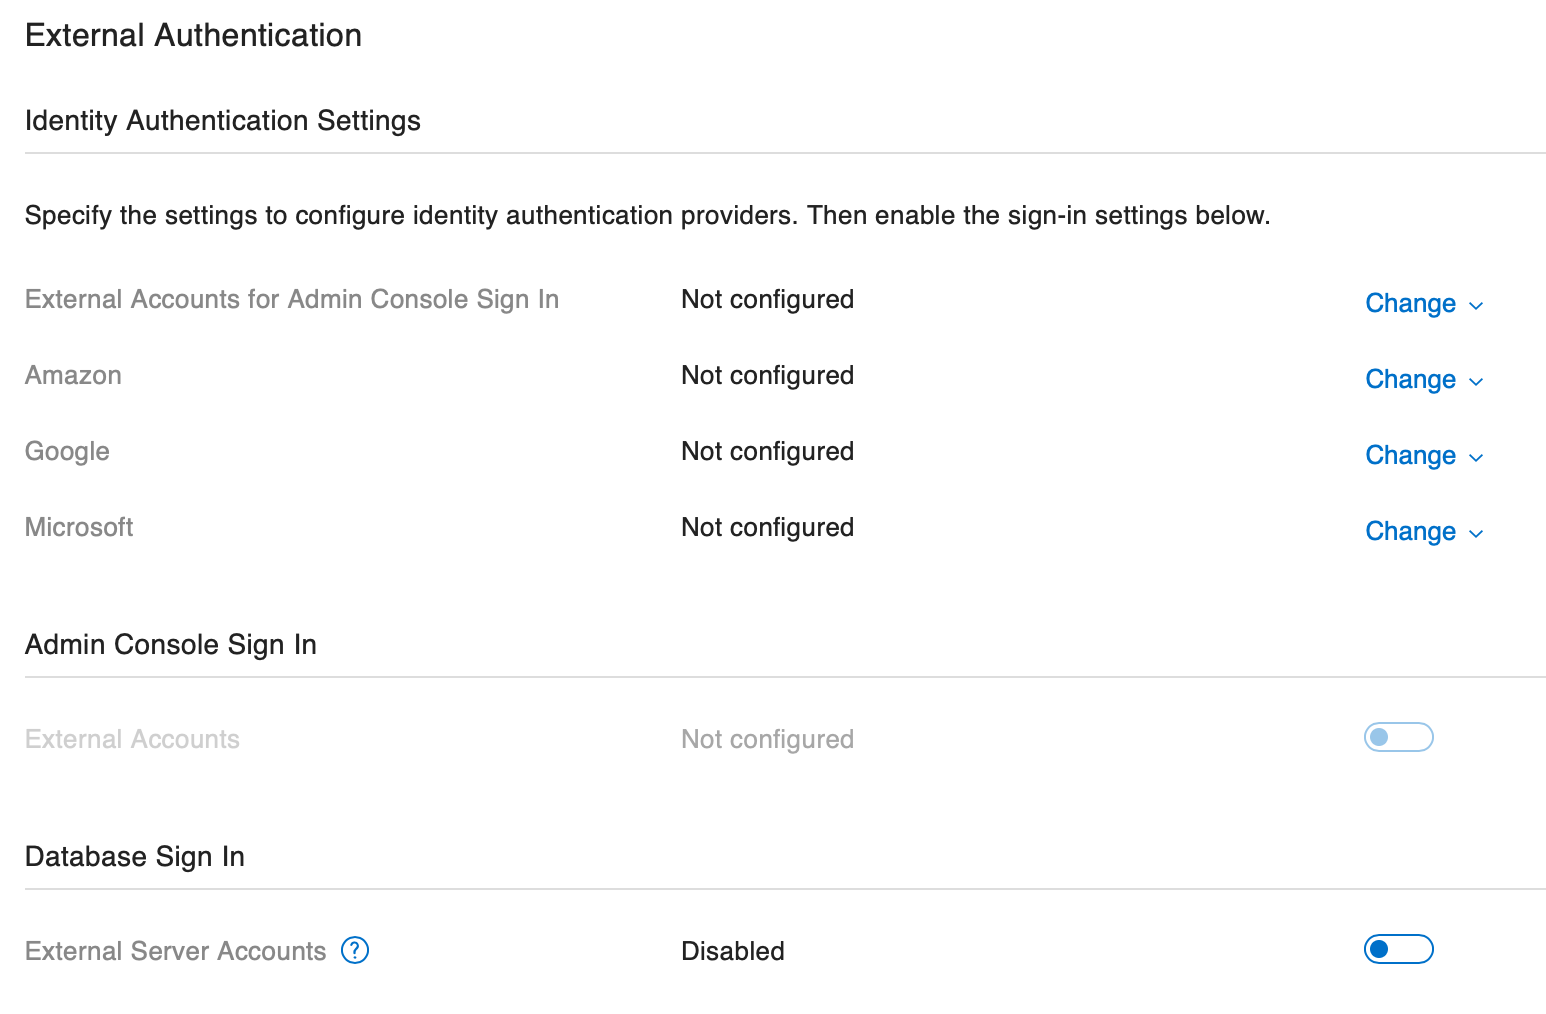
But, instead of relying on Amazon, Google or Microsoft for authentication, we'll have our own authentication server. We will in fact be utilizing the above area of FileMaker Server's configuration during the set up process.
Why Use Keycloak?
FileMaker already has pretty robust security though doesn't it? Well, yes, we can encrypt the database file, we can use SSL for encryption in transit, and we can use those authentication options above. But the default method of allowing access is to set up individual users/passwords within the database file and assign them to privilege sets.
In doing this though, we are limited with how we can apply more complex password rules. We can't enforce multi-factor authentication. We can't apply and use password-less authentication options. Elsewhere, these types of options are becoming standard and we in the FileMaker community need to keep up. We can do better to protect our data, and using Keycloak for free is one way of doing this.
The Operating System
Keycloak can be installed on Linux or Windows. The option of Windows is probably appealing for most people, but it has an overhead and cost associated with it. If you want to pursue that path then that's cool, but we are going to embrace the Linux world - we as FileMaker developers need to get more familiar with this operating system anyway right?
In the first part of our series, we have opted to use Ubuntu as the flavor of Linux to install. Although, at the time of writing, FileMaker Server on Linux uses CentOS, this operating system is coming to end of life at the end of 2021 and so using an operating system that is still supported makes more sense.
Ubuntu is also readily available on AWS should you wish to deploy Keycloak more robustly on that platform.
The Hardware
Given that Keycloak and Linux are open source and therefore have no cost, and that we're hoping to encourage adoption without costs being a barrier, as we did with our Zabbix tutorials, we're going to use Hyper-V on Windows 10 to create a virtual machine.
With many people having a Windows machine kicking around, again this should be zero cost for the majority. If you're not familar with Hyper-V and how to create a virtual machine, check out our FileMaker Server & Zabbix: Setting Up a Server Part 1 blog post for details.
You can of course use any kind of hardware, cloud server or virtualization that suits you, be that AWS, VMware, Parallels etc.
The Series Outline
This series is quite lengthy and is broken down into easy to follow steps to get up and running with Keycloak. There are a lot of commands to execute along the way, and it's important to read the result of executing those commands to check for errors - if you blaze past an error, it's extremely likely your Keycloak deployment will not work.
- Part 1: Installing Ubuntu
- Part 2: Installing Keycloak
- Part 3: Installing A SSL Certificate
- Part 4: Adding A MySQL Database
- Part 5: Configuring Keycloak
- Part 6: Configuring FileMaker
- Part 7: Configuring Two Factor Authentication
- Part 8: Secure Password-Less Authentication
- Part 9: Custom IdP Options In FileMaker 19.4
- Part 10: Keycloak 16 & SSL Configuration
Keycloak 17:
Keycloak 17 was released in mid February 2022 and it has a vastly different underlying technology which makes it faster to use and much faster to deploy. Check out the installation and configuration tutorial series below:
- Part 1: Ubuntu & MySQL
- Part 2: Let's Encrypt SSL Certificate
- Part 3: Preparing Keycloak 17
- Part 4: Starting Keycloak 17 & Next Steps
2021-08-25 Update: If you're interested in using Google authentication and groups with FileMaker via Keycloak, check out the article from Jason Wood of Define Database as he explores how to make this work: FileMaker group-based authentication with Google and Keycloak.
2022-01-12 Update: The deployment options for Keycloak in the FileMaker community continue to evolve with contributions from more and more developers. This is great to see and the most recent development is the use of a Nginx Reverse Proxy in front of Keycloak from Wim Decorte of Soliant Consulting. If you're wishing to use your own SSL certificate instead of Let's Encrypt as this tutorial uses, this post is for you: FileMaker OAuth: Reverse Proxy in Front of a Keycloak Identity Provider.
Acknowledgements
During the course of writing this series, we relied heavily on countless webpages, forums and articles, and for all those who have gone down the Keycloak path before us, thank you for your contributions. In addition, for one hurdle we encountered along the way, we have to thank Wim Decorte from Soliant Consulting and Connor Brock from Claris for helping clarify settings and providing ideas on debugging until we finally found the cause of the issue and a workaround.
Summary
Writing this series certainly had its challenges but we hope that it inspires others to venture into the world of better security, utilizing oAuth providers. We absolutely understand that setting up and running your own Keycloak server will not be for everyone but if you're interested and need help, feel free to contact us for a consultation. Next up is part one of our series, where we install Linux on our virtual machine.


