FileMaker Backups
While this article is less about the FileMaker Server backup system and more about the AWS environment, we would be remiss to not at least touch on the subject.
Firstly, you are doing backups of your data, right? If the answer to that question is not an absolute, categorical, one hundred and ten percent "Yes, of course, how could you even ask?", then stop what you're doing right now and go sort it out. Right now. Seriously.
The FileMaker Server admin console provides an excellent interface for setting up schedules of various kinds, and one of these is backups. You can backup every hour, day, week, month or after any number of days, or all of the aforementioned and more. You can even do progressive backups. It's super flexible and reliable.
What your backup strategy is will be down to you: what you're comfortable with, how often your data changes, etc, etc. There's no right answer, but once a day is a good starting point. If you need help with figuring this out, consult the FileMaker documentation or contact us and we'll be happy to help you get your backups on track.
So What's The Issue?
So, you're backing up already and you're beginning to wonder what the issue is. Well, FileMaker Server cannot backup to remote volumes. What that means is if you left the default backup destination as:
filewin:/C:/Program Files/FileMaker/FileMaker Server/Data/Backups/
then your backups live on the same hard drive as your live database files. What happens if your hard drive fails? Or, in the world of AWS, what happens if your Instance gets terminated?
Answer: PAIN. You've lost your live files and your backups.
So, this is where "offsite" backups come into play. You keep backups on separate hardware so if the primary hardware fails, you have something fairly recent to fall back on. There's any number of ways of doing this and below we detail just one option.
Why We Like It: Because it utilizes the very affordable resources of AWS, but it also utilizes the FileMaker Server scheduling functionality so all the backup procedures are in one place for review as needed.
Amazon Simple Storage Service (S3)
Amazon Simple Storage Service (S3) is what we are going to utilize for our "offsite" backups. It's not related to our server Instance, so if that gets terminated our S3 data still exists.
While there is a Free Tier option for S3, it's worth noting the costs associated with S3 are negligible. In fact, at less than 2.5 US cents per month per GB, it's ridiculously cheap. As always, be sure to familiarize yourself with costs here: Amazon Web Services: S3 Pricing.
So, what's the plan?
- Our FileMaker Server is already doing backups to the default location on a schedule that we are comfortable with.
- We'll install the AWS Command Line Interface - this is a simple install procedure to allow us to talk to our S3 storage.
- We're going to set up a "Bucket" (you could consider this a folder) in Amazon S3.
- We're going to have FileMaker Server run a system-level script, on a schedule that we specify, just like our backups, that will copy the contents of our backup folder to our S3 bucket.
- And with that, we have our data stored "offsite" and we can sleep easy...
Installing The AWS Command Line Interface
Don't be intimidated by the sound of this. It's a very simple install of some functionality to allow us to talk to our S3 bucket using our system-level script.
Head over to AWS Command Line Interface. As of the time of writing, look on the right hand side at the top and there should be a link to: "Windows: Download and run the 64-bit or 32-bit Windows installer."
Choose the 64-bit installer, download this to your AWS Instance and run the file. Just opt for all the default settings as you progress through this installation. And that's it, we're done with this piece. Onward!
Creating A Bucket In S3
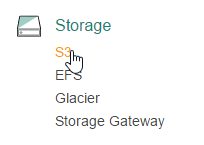
To set up a bucket in S3, go to Services in the top menu and select S3 under the Storage section:
Click the Create Bucket button and fill in the form that appears. Bucket names must be unique, so perhaps use your business name in there. Avoid spaces in the bucket name. For this example, we called ours "sounds-essential-test". For the region, select the one that is the same as where your EC2 Instance is running.
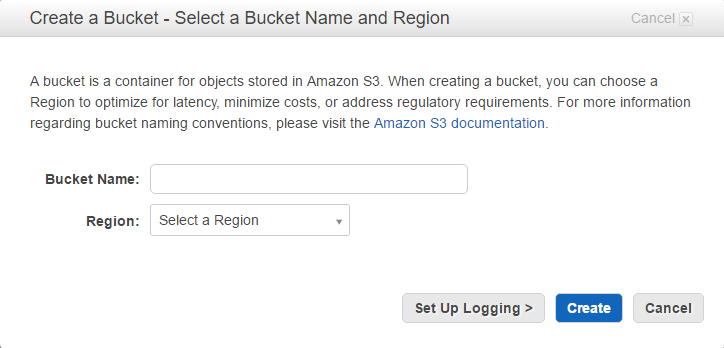
Click Create and we're done. We now have a bucket to place our FileMaker backup files in.
Setting Up The Backup Script
The way we will transfer our backups to our S3 bucket is by using a small script. The script uses an IAM user account to authorize the S3 access. If you followed our guide, you should have set up an IAM user in FileMaker Server on Amazon Web Services: Part 1. If not, go check that out. Our script will contain the following:
#echo on
set AWS_ACCESS_KEY_ID=[insert aws access key here]
set AWS_SECRET_ACCESS_KEY=[insert aws secret access key here]
set AWS_DEFAULT_REGION=us-east-1
aws s3 sync "C:\Program Files\FileMaker\FileMaker Server\Data\Backups" s3://[insert S3 bucket name here] --delete
Do not include the square brackets when you populate these values yourself. We've left the region as the Standard US version but you may need to adjust this depending on where you set up your bucket. And we're assuming your FileMaker Server backups are in the default location, but adjust this if needed.
The last line has 'delete' at the end of it. This deletes what's in the bucket when we transfer our backup files. This is fine for us because we handle the number of versions of backups that we keep in our FileMaker Server backup strategy, and we're just using this S3 storage to have another copy of those backups on different hardware.
So, the script above should be pasted into Notepad, filled in with your details and saved as something meaningful like fm_s3_backup.bat. Note the file extension. The location the script should be saved is: C:\Program Files\FileMaker\FileMaker Server\Data\Scripts
Setting Up The FileMaker Schedule
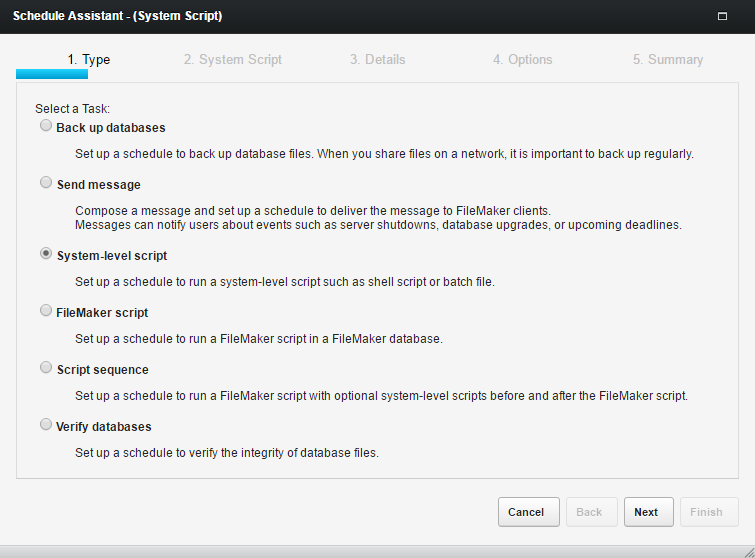
We'll be triggering our script from the FileMaker Server admin console on a schedule by using the System-level script schedule function. In the FMS admin console, go to Schedules, Create New Schedule and select System-level script.
Click Next and select the script you saved from the drop down selector.
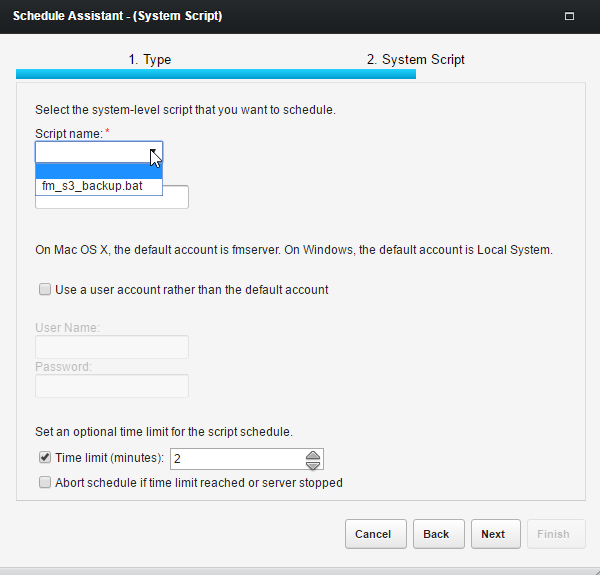
We don't need any parameters so you can leave that blank. It's possible that you may need to use your Windows server admin account as the username and password but try the default account to begin with.
Click next and continue with the set up of the schedule, including how often this schedule should run. We'd suggest at least once a day, and ensure that it runs when FMS is not performing a backup using another schedule.
Once you have done this, run the schedule and then go check your S3 bucket in AWS and you should find an exact replica of your backup folder from the Windows server. If you don't, edit the schedule and enter the Windows Server admin account on step 2 - this should hopefully resolve any permission issues.
Summary
Backups are a critical aspect of any computing environment. Using the above technique can provide you with an extra level of safety when it comes to ensuring your data is backed up should disaster strike.
If you have any questions or need help with doing this, don't hesitate to reach out to us.


