
Terminology & Assumptions
Let's start by ensuring we're on the same page as regards some terminology and assumptions. (Update 2020-02-04: While this article refers to older versions of Windows and FileMaker Servers, everything below is applicable to later versions as well.)
- We have our AWS account set up - this is our account that gives us access to the vast world of Amazon Web Services.
- We have launched an EC2 Instance - most likely a Windows 2012 Server running FileMaker Server 14 or 15.
- We have an AWS security group set up with the necessary ports open, and the Windows firewall is correctly configured to allow traffic to our FileMaker data files.
- When deploying the EC2 Instance, it would have been assigned a public IP address. This allows you to use FileMaker Pro to find the server and access your data files from your office.
- This public IP address is displayed in your Instances list in the AWS dashboard environment, as well as in the top right when you remote desktop into your server.
What Happens If The Public IP Address Changes?
Most servers on the internet have an IP address in the form x.x.x.x - where 'x' can be a one, two or three digit number. That's what your public IP address assigned to your Instance is. Your server can be reached at this number. Now, you can assign a domain or subdomain to this IP address to make it more memorable, but in the end it is the IP address that is used to route traffic to your server.
If everything stays the same, your IP address will not change and all may seem fine - you can access your server via that address. But what happens if that IP address changes? Wait, the IP address can change? Oh yes, sometimes through actions you may take and at other times events that are out of your control. Some examples of when your public IP address will be released and put back into the public IP pool for another customer to take are:
- Shutting down the server, even for a short period of time. (Note: a reboot is not a shutdown.)
- Changing your Instance Type - perhaps adding more resources or moving to a lower spec server to save money.
- Amazon decommissioning the hardware your server is running on.
There may be more, but as you can see, there are perfectly normal day-to-day activities that could result in your public IP address changing. And this could be devastating to your operations if suddenly people can't access the database files they rely on.
Elastic IP To The Rescue...
So this is where an Elastic IP address comes in. Think of an Elastic IP address as a static IP address that pretty much belongs to you for as long as you keep it active.
The way it works is that you request an Elastic IP address and then assign this IP address to your Instance. At that point, the public IP address you were initially assigned gets put back into the pool of public IP addresses and the server is now accessible via your Elastic IP address.
So now, if you stop your Instance and then restart it a few minutes/hours/days later, because the Elastic IP is assigned to that Instance, it will be accessible on the same IP address as it was before you shut it down.
As you begin to use AWS more and more, Elastic IPs start to show other uses, too. Let's say you've been using FMS14 for a while but want to move to FMS15.
One way to accomplish this would be to block user access to your current server, uninstall 14, install 15, hope everything works out ok and a few hours later (hopefully) you can let users back on to the server.
Or, you could spin up a second new server, install FMS15, test everything is working fine using the public IP address it was initially assigned, and then once you're ready switch the Elastic IP to the new Instance resulting in almost no downtime for users. Their traffic will be routed to the new server running FMS15, and you'll look like a hero.
Assigning An Elastic IP Address
Assigning an Elastic IP address to an Instance is pretty straightforward:
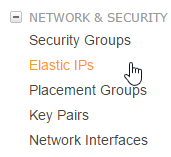
- Navigate to the EC2 Dashboard.
- In the left vertical menu under the Network & Security section, select Elastic IPs.
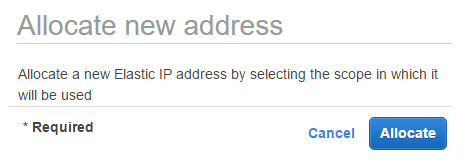
- Click the "Allocate new address" button.

- Click the "Allocate" button.
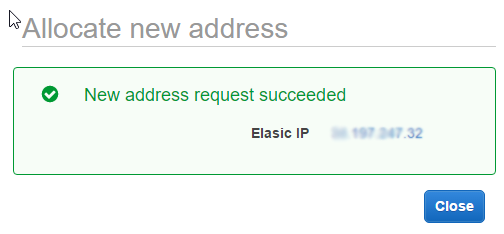
- At this point you have been allocated an Elastic IP address.
But you now need to assign it to your Instance.
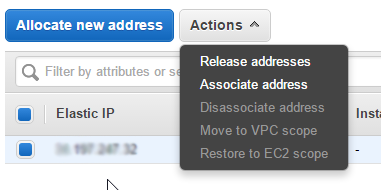
- Return to the main Elastic IP screen - you should see the IP you were just allocated in the list.
- Ensure the check box on the left is filled in blue.
- From the Actions menu at the top of the screen, select "Associate Address".
- In the Resource Type, choose Instance.
- Under the Instance section, use the drop down to select the Instance this IP should be associated with.
- Select the Private IP - there will likely only be one to choose from.
- Decide if you want to be able to reassociate this IP address in the future.
- Click the blue Associate button.
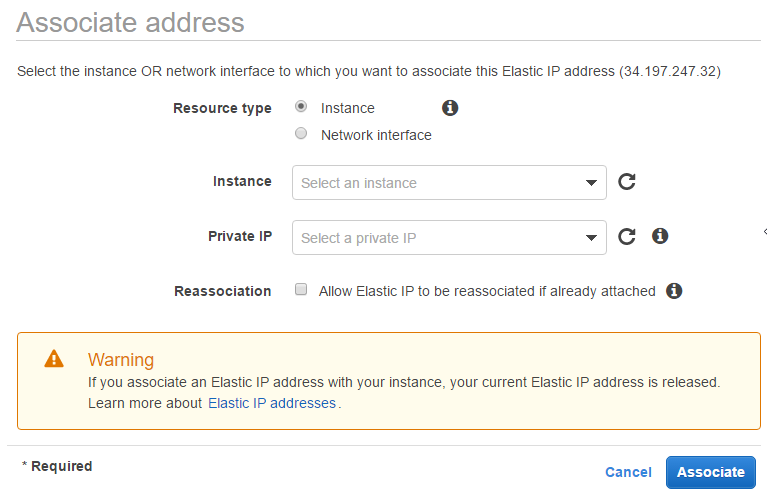
And, that's it! Your server is now accessible using this Elastic IP. The original IP address assigned when you created the Instance has been released for someone else to use.
It is worth pointing out that one Elastic IP associated with an Instance is free of charge, as long as the Instance is running. There may be some costs (albeit minimal) if your Instance is not running or you have multiple Elastic IPs associated with it. Do consult the documentation and pricing before deploying to ensure you know where you stand on this front.
Summary
As we've demonstrated, obtaining and assigning an Elastic IP address is pretty straightforward and provides for continuity and reliability for access to your FileMaker Server. We would even go as far as saying it's a must for deploying on AWS.
Of course, it wouldn't be AWS if there wasn't a bunch more to know about Elastic IPs, and you can find plenty more info here: Amazon Web Services: Elastic IP Addresses.
We hope this has been a good introduction to Elastic IPs on AWS, and how they can help your deployment in the cloud. If you need any help with any of this, don't hesitate to contact us.


