What is an SVG?
SVG - Scalable Vector Graphic - is an XML-based vector image format for two-dimensional graphics with support for interactivity and animation (Wikipedia). So, rather than an actual image, an SVG is composed of some XML code that defines where the lines are, their thickness, corner radius, etc. Everything you see is a result of this XML code.
Why bother using an SVG?
Sounds more complicated than just an image, so why would we want to use them? Well, for very good reasons.
Scalable: SVGs, as the name says, are scalable. You can make them as big as you want without losing any definition of the image. So, in the FileMaker world, if you have one instance of an image that's small and elsewhere the same image that's bigger, we can use the same source image/SVG.
Size: SVGs can be 10 times smaller in file size than an equivalent PNG image. As a result, our layouts in FileMaker can be much lighter and load far faster - a critical issue when considering WebDirect and WAN connections to a database.
Style: Because they are composed of XML code, SVGs can be styled using CSS. This allows you to apply a color to an icon in the same way you would apply color to text. You can also use conditional formatting to apply styling to a SVG. Among many other advantages, this makes it much easier to create active and hover state formatting in menus.
Where do I get SVGs?
Some of the many places from which you can source SVGs are listed below. It's also possible to make your own using something like Adobe Illustrator. There are even free online image converters that will take your traditional JPEG or PNG and convert it to a SVG (Disclaimer: So far we've not found these to be a particularly good resource.)
SVG web resources:
IcoMoon: https://icomoon.io
FlatIcon: http://www.flaticon.com
The Noun Project: https://thenounproject.com
Getting SVGs into FileMaker Pro
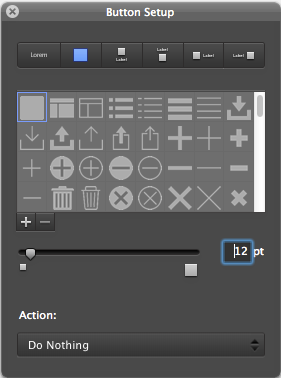
Now that we've convinced you SVGs are a good fit for use in some aspects of your FileMaker solution, how do you implement them? Well, it's pretty straightforward. Simply add a new button or double click an existing one. If you have selected a button type that includes an icon option, the following appears:

That plus button just above the slider is your ticket to adding your own SVG to the standard ones that come with FileMaker.
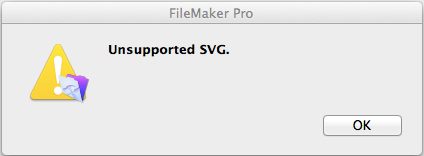
Until, after trying to add it, you encounter this dialog telling you your SVG is not supported:

Digging into the SVG XML code
So, what's up with our SVG and how do we fix it? FileMaker has some particular requirements when it comes to SVGs and we need to make sure these are in place. In addition, if we want to be able to style the icon then we need to add a small piece of code to allow FileMaker to do this - FileMaker may add this for you when you import the SVG, but it's good practice to make sure it's there before importing.
The Filemaker help site provides an excellent resource for figuring out the required XML. As you'll see, the structure of the XML should be as follows: (please note spaces have been inserted at the beginning and end of each tag for rendering purposes but are not required in the actual code)
< ?xml version="1.0" encoding="utf-8"? >
< svg version="1.1"
xmlns="http://www.w3.org/2000/svg"
xmlns:xlink="http://www.w3.org/1999/xlink"
width="200"
height="200" >
< g class="fm_fill" >
< rect x="50" y="25" rx="5" ry="5" width="100" height="125" / >
< /g >
< /svg >
If you have an SVG, simply open it in a text editor to view the XML.
A few important things to note. First, ensure that all attributes within a tag have spaces between them, like this: x="50" y="25" rx="5", not like this: x="50"y="25"rx="5".
Second, in order for FileMaker to be able to style the SVG, the attribute class="fm_fill" must be added to the XML - as above FileMaker may add this for you when importing. A good place to add this is in the first < g > tag - every element after this tag inherits those attributes.
Third, we have not specified a fill color within the XML - this will be handled by FileMaker once it is imported.
If FileMaker is rejecting an SVG, go through the code carefully, looking for correct open and close tags and ensuring there are spaces between the attributes. Check to make sure that all attributes being used are supported by FileMaker.
Just one last thing...
Using a variety of icons from different sources increases the chances that they will all be formatted slightly differently. Some may be offset more than others, some bigger, some smaller etc. If you're building a menu bar where you need a consistent look, this can be a problem. There may be a variety of ways to go about dealing with this, but this is what we did. It does involve the use of Adobe Illustrator although it can probably be hand coded or a similar program utilized.
- Open the SVGs in Illustrator and figure out the max width and height you need your icons to be.
- Then using the black selector tool, drag across the entire image, highlighting all the elements of the SVG.
- Set either the width (if it's a landscape image) or height (if it's a portrait image) to the calculated max values, making sure you've clicked the link the constrain proportions.
- Then go to menu item Object > Artboards and select Fit To Selected Art.
- Deselect the objects by clicking outside of the image. Then navigate to Document Setup > Edit Artboards and set the opposite width/height value to the max values you used above.
- Save your file and then edit it in a text editor to insert the fm_fill class.
In doing this, all the icons are centered, sit on the same size canvas and are all proportional to one another.
We hope you find this helpful, but if you have any questions about using SVGs in FileMaker, don't hesitate to get in touch.


