
Setting Up A Keycloak Server For Authenticating To FileMaker: Part 5: Configuring Keycloak
Lesson in Brief: Setting Up A Realm, Client, Groups And Users
So far in our Keycloak series we have been setting up the infrastructure for our server to run on, but now that's done we can actually configure Keycloak to act as our authentication server for FileMaker. We'll be using the Keycloak Administrator Console to do this, so let's get logged in and get things set up.
Before We Begin
Before we jump into Keycloak, a reminder that the inspiration behind this series was the result of the work of Wim Decorte and Steven Blackwell. We strongly encourage all FileMaker developers to read their white papers, a list of which can be found here. We will be focusing on the steps to get Keycloak and FileMaker Server working. If you're interested in some of the background information and details, please read those white papers.
Definitions
To begin, let's explain the elements that we'll be setting up. Each IAM system has their own wording for various parts of the system. The ones we'll be touching on in this article are:
- Realm: You can consider this to be your organization or company, but in a more complex deployment it could be a department. Everything below lives in a realm.
- Client: As FileMaker developers we think of a client as a user connecting to FileMaker Server with either Pro or Go, but in the Keycloak world think of this as an application that will use Keycloak for authentication - for us that's FileMaker Server of course.
- Client Scopes: A client scope is a grouping of information about a user that is passed back to FileMaker Server, and we'll be needing the user's email address and what groups they belong to.
- Group: We'll be setting up groups which are to be used in the same way as we know them in FileMaker - we may have a user group and an admin group that end up with a different set of privileges granted to them by FileMaker as determined by you the developer.
- User: A user is, yup, a user - you or me logging into a FileMaker database.
Setting Up A Realm
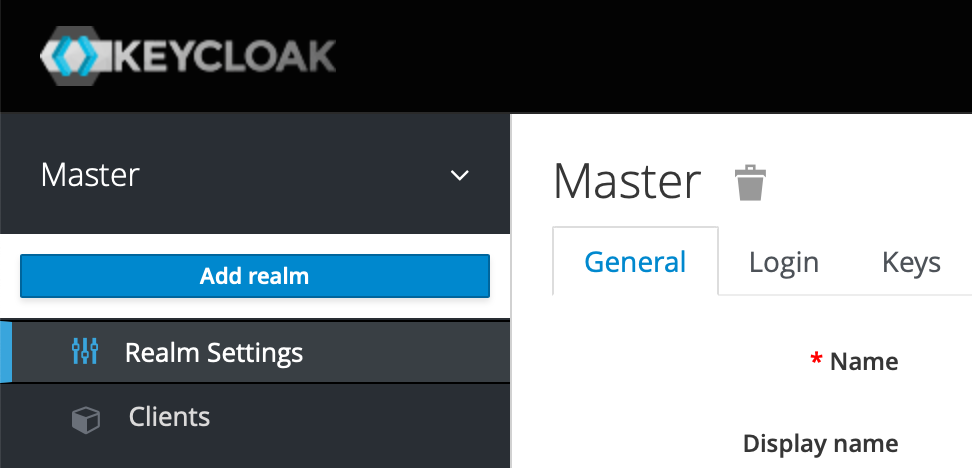
Log into Keycloak by going to https://DOMAIN_SUBDOMAIN/auth/admin/ - as usual, replace the placeholder with your actual domain name. In the top left you'll see we have a realm already called Master, but we shouldn't use this so we'll set up a new one. Hover over the word Master and you'll see a button to add a realm as below:
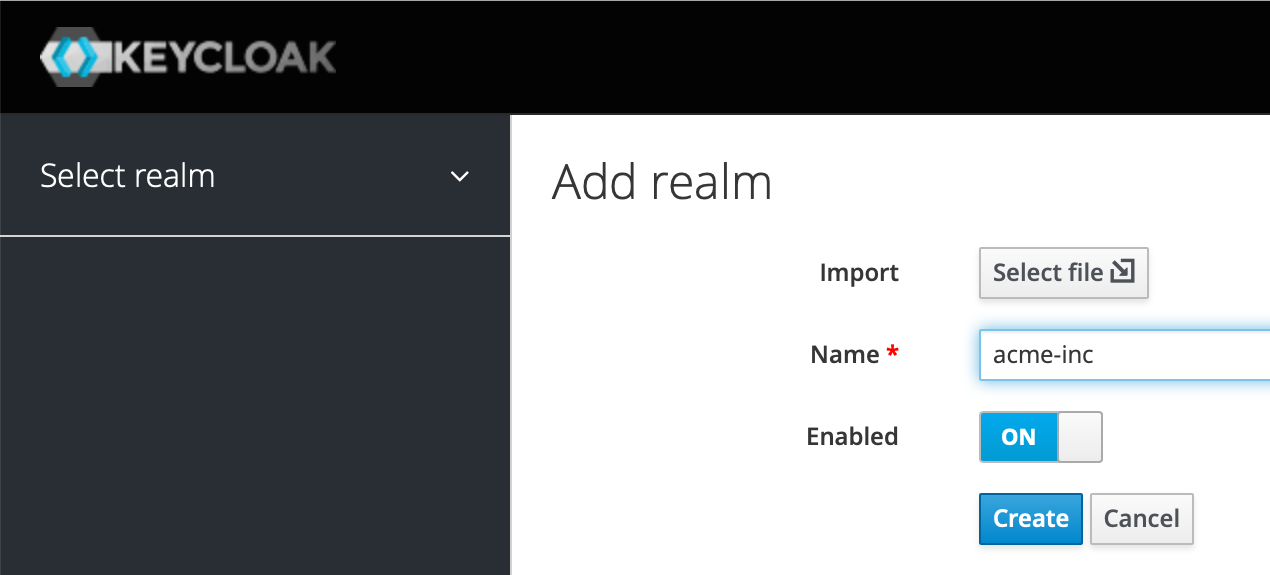
Click that and then type the name of your realm. We'd suggest avoiding spaces and weird characters. Then hit Create and note it may take a moment and not look like it's doing anything, so be patient.
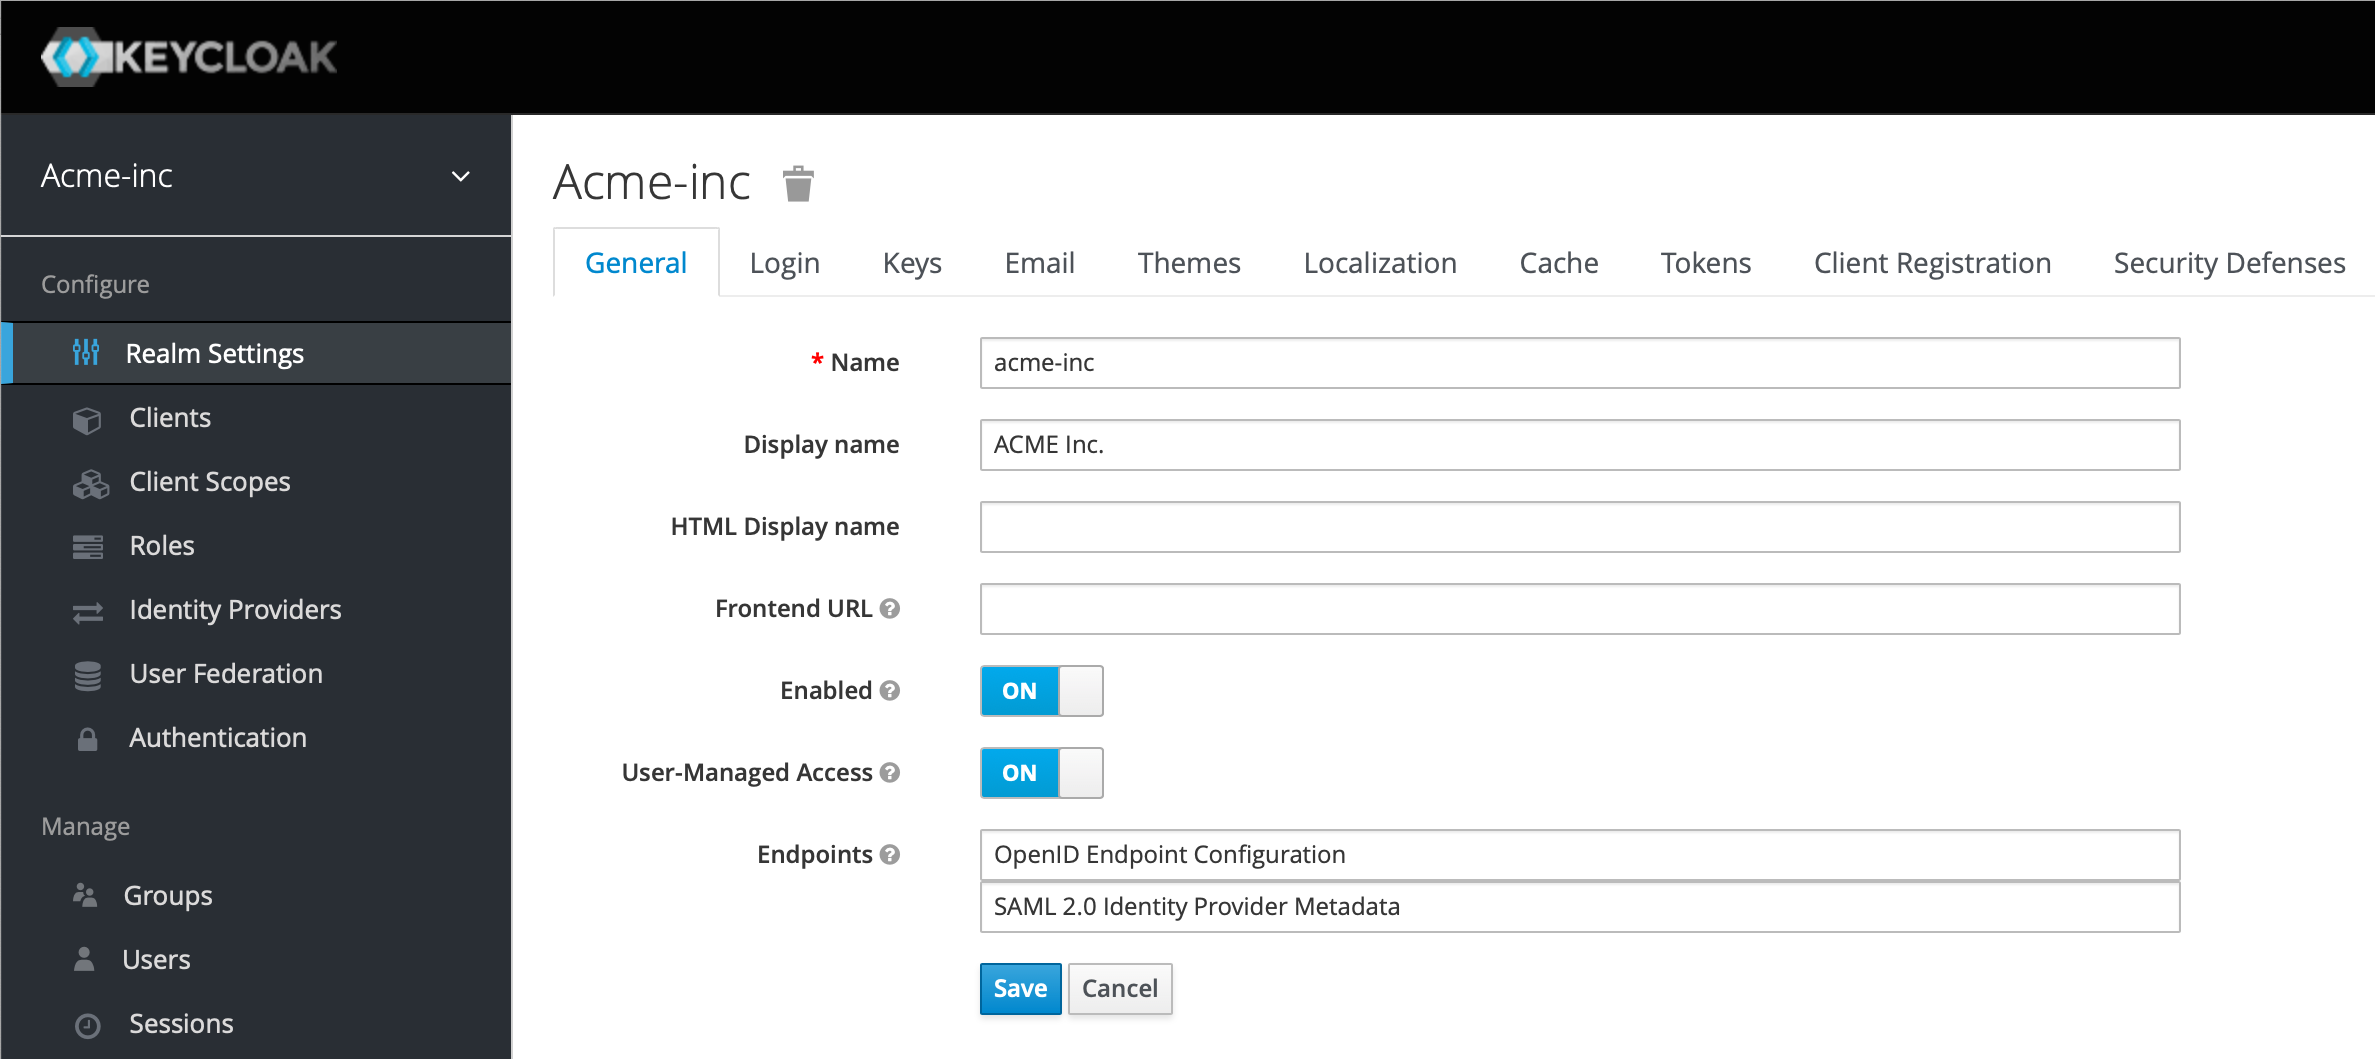
We're going to add a display name, turn on the User-Managed Access toggle and click Save as below.
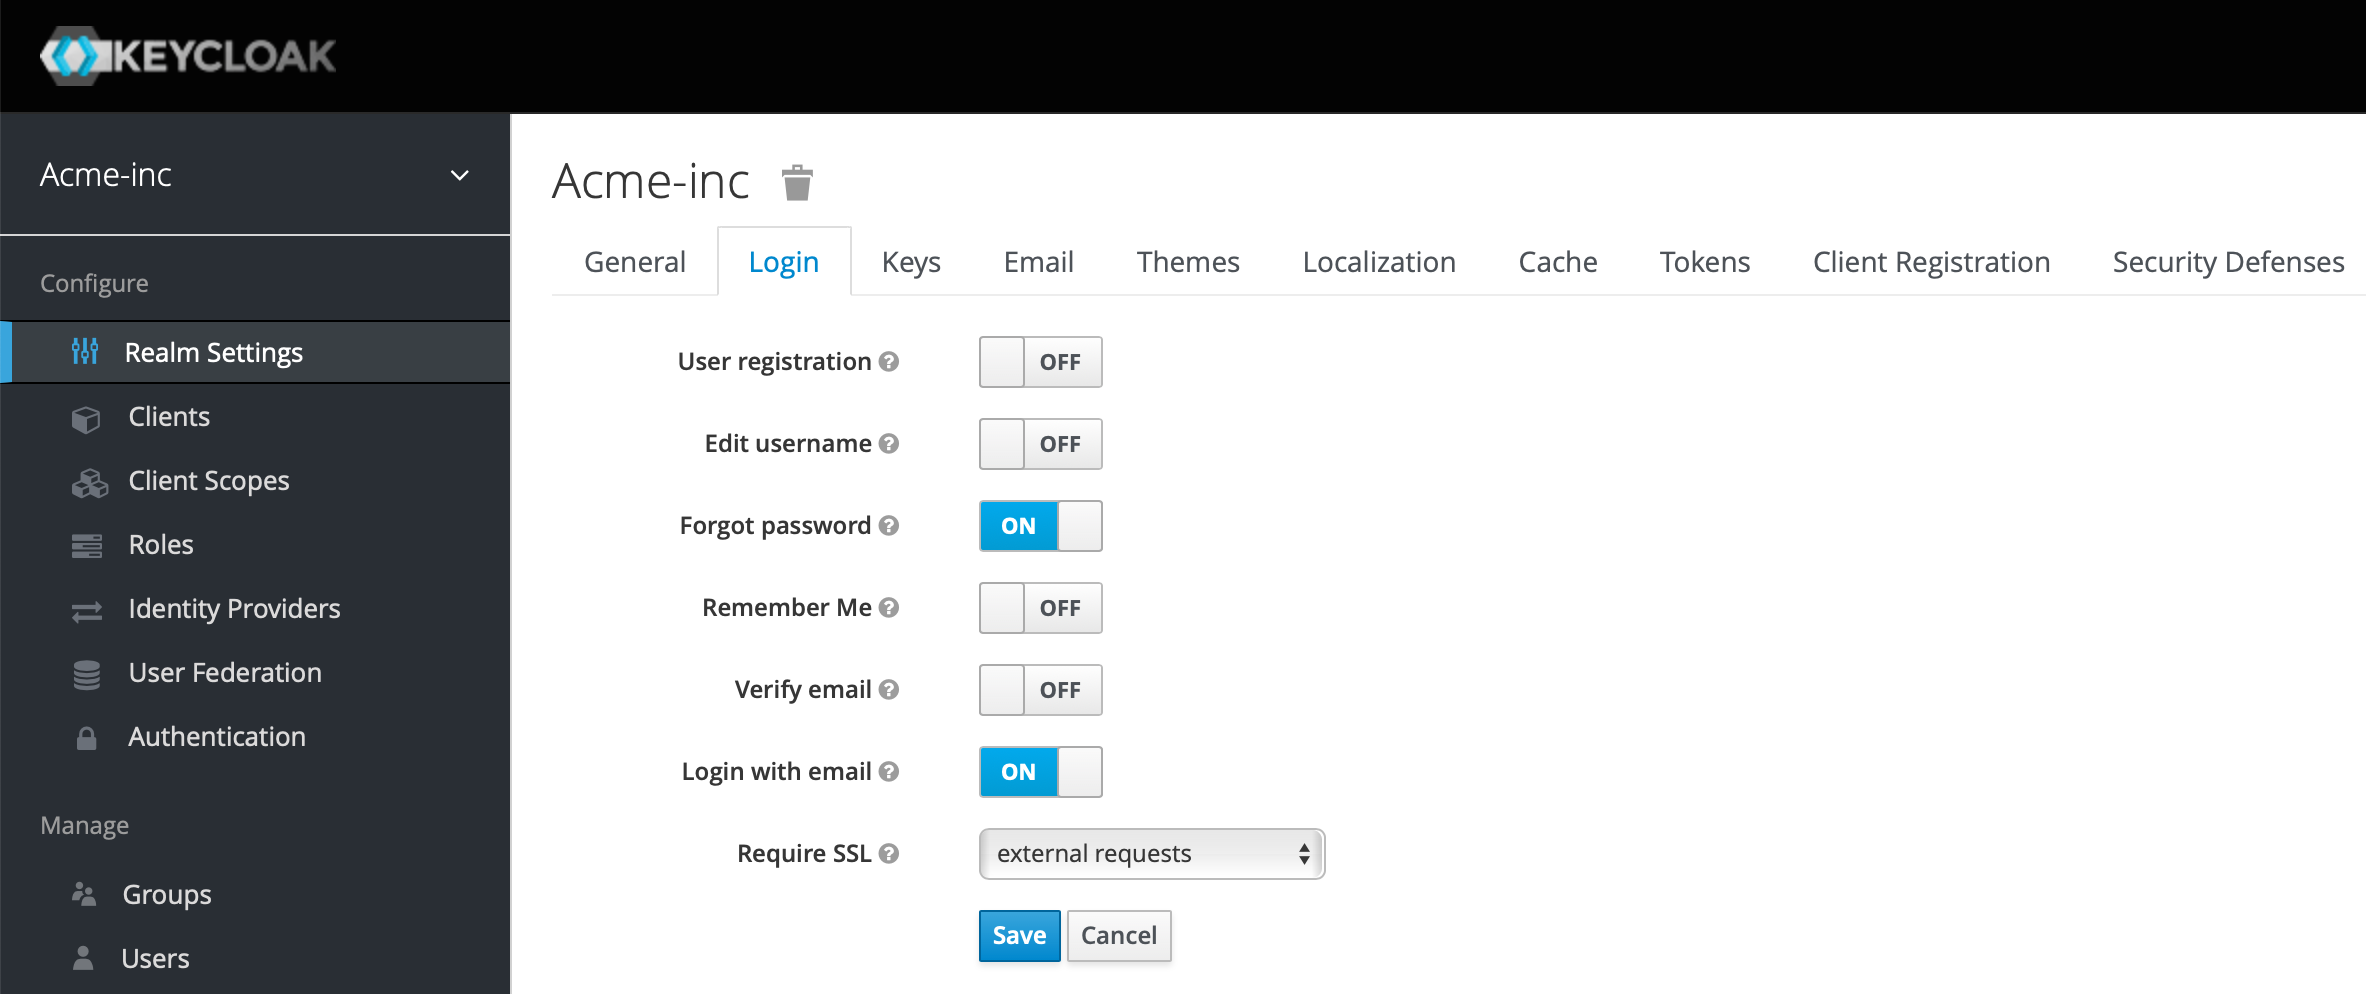
On the Login tab, we're going to enable "Forgot password", allow "Login with email" (even though we'll use the user's email address for their username) and leave the "Require SSL" as external requests. Click Save.
It'll be useful to have our Keycloak server dispatch emails as needed, so go ahead and fill out the Email tab with your smtp details:
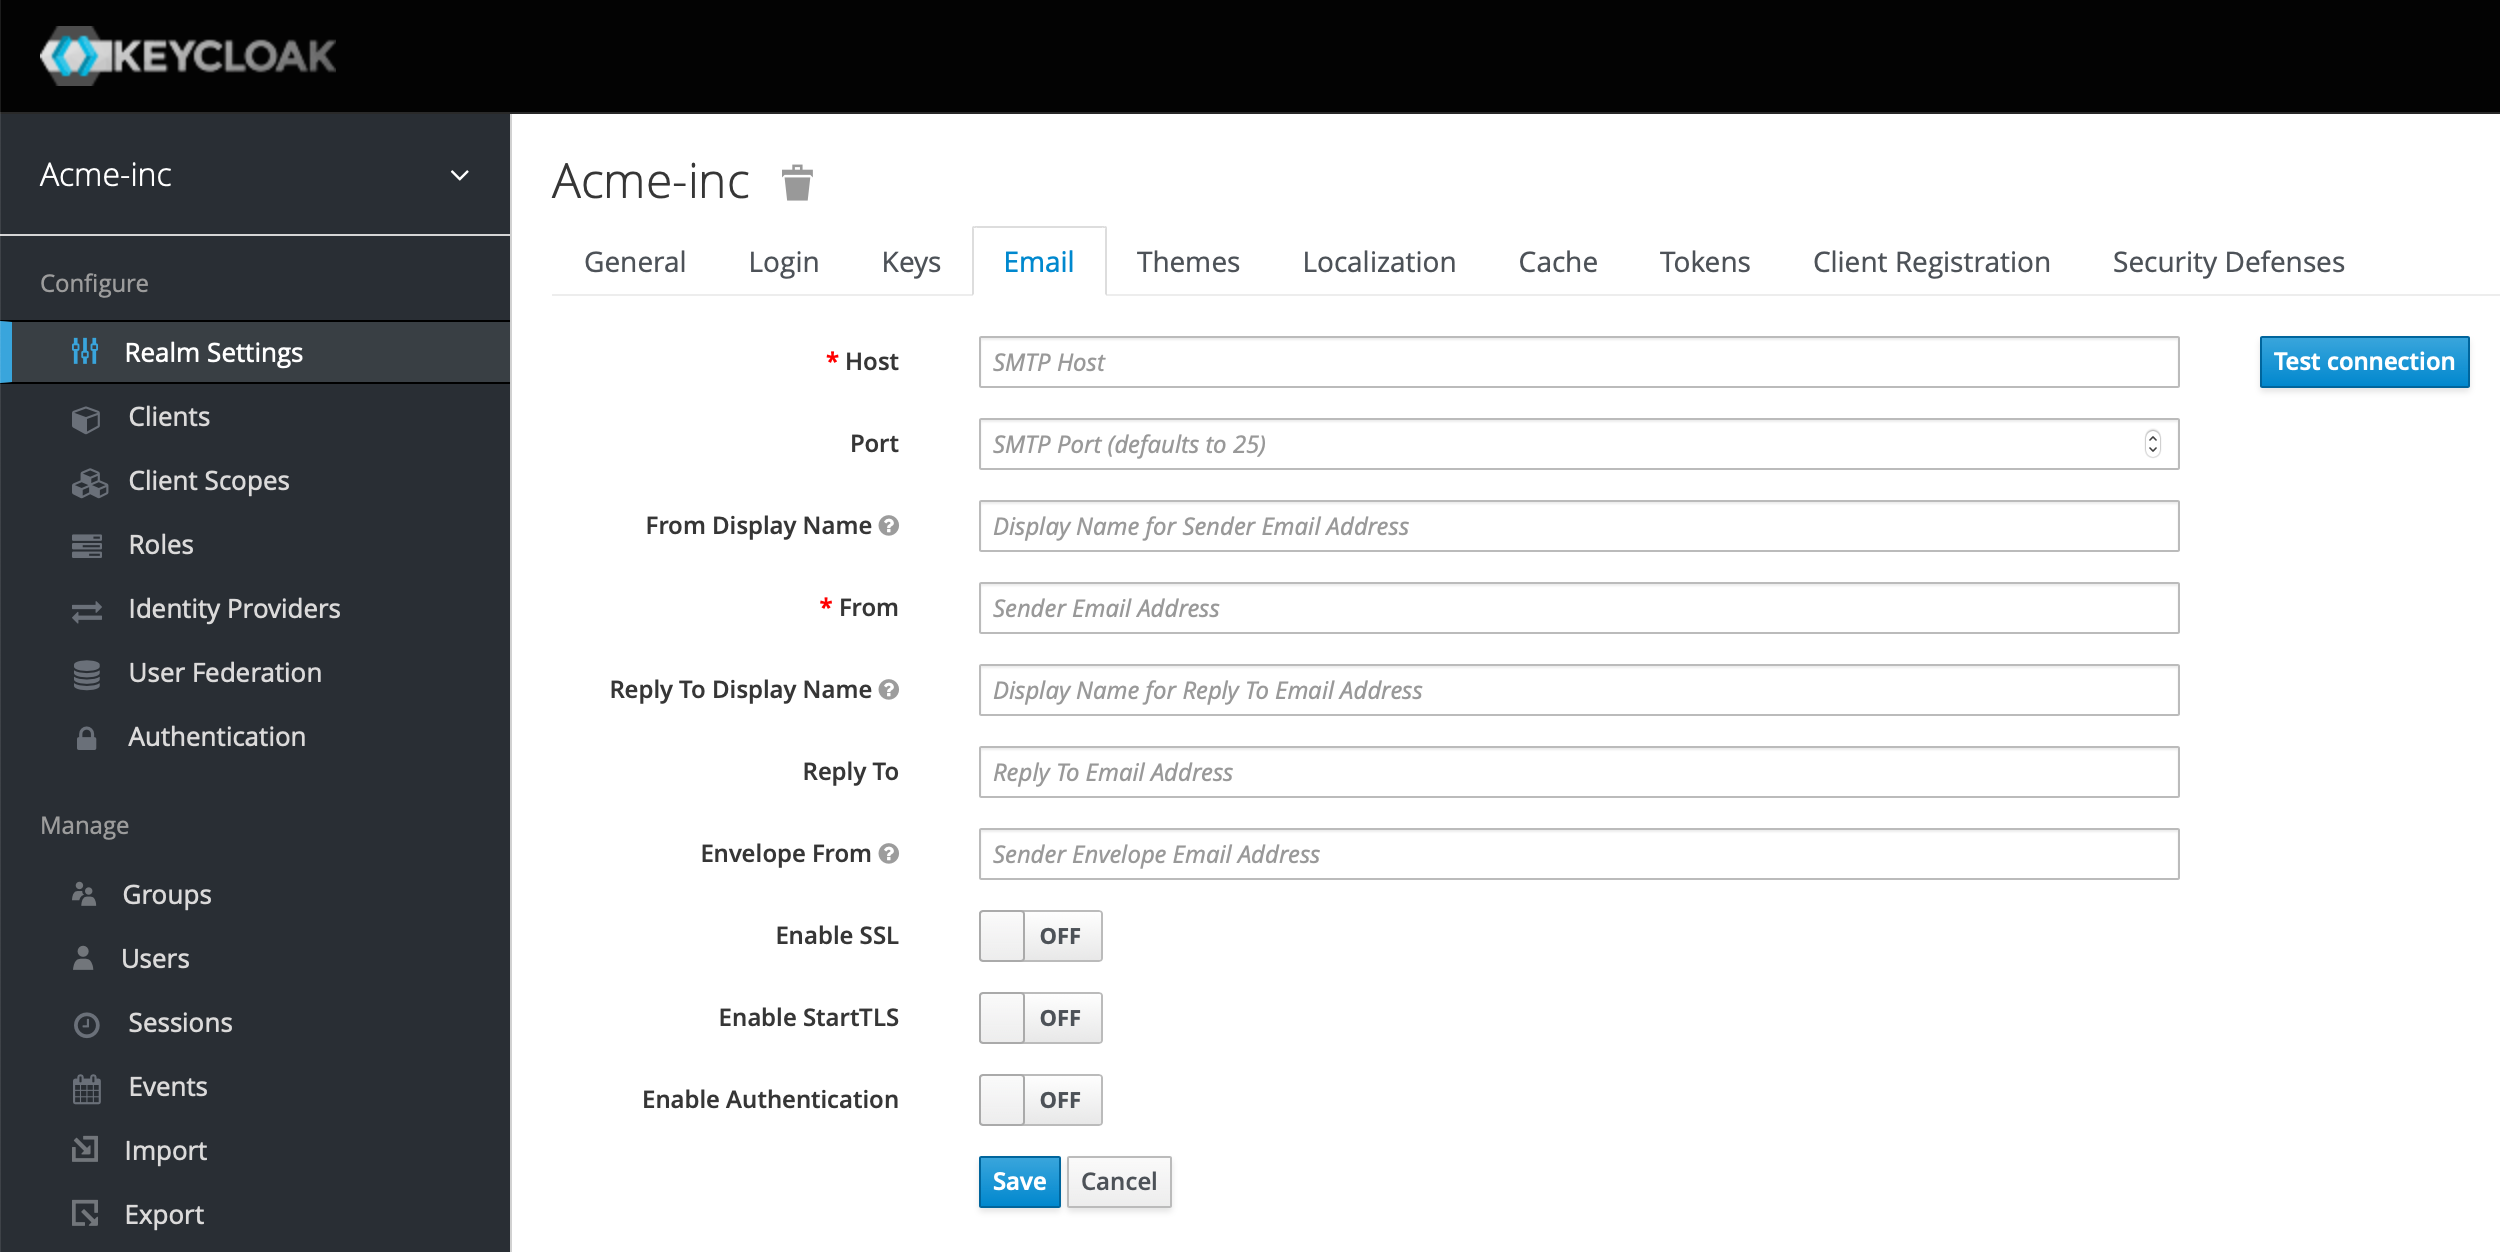
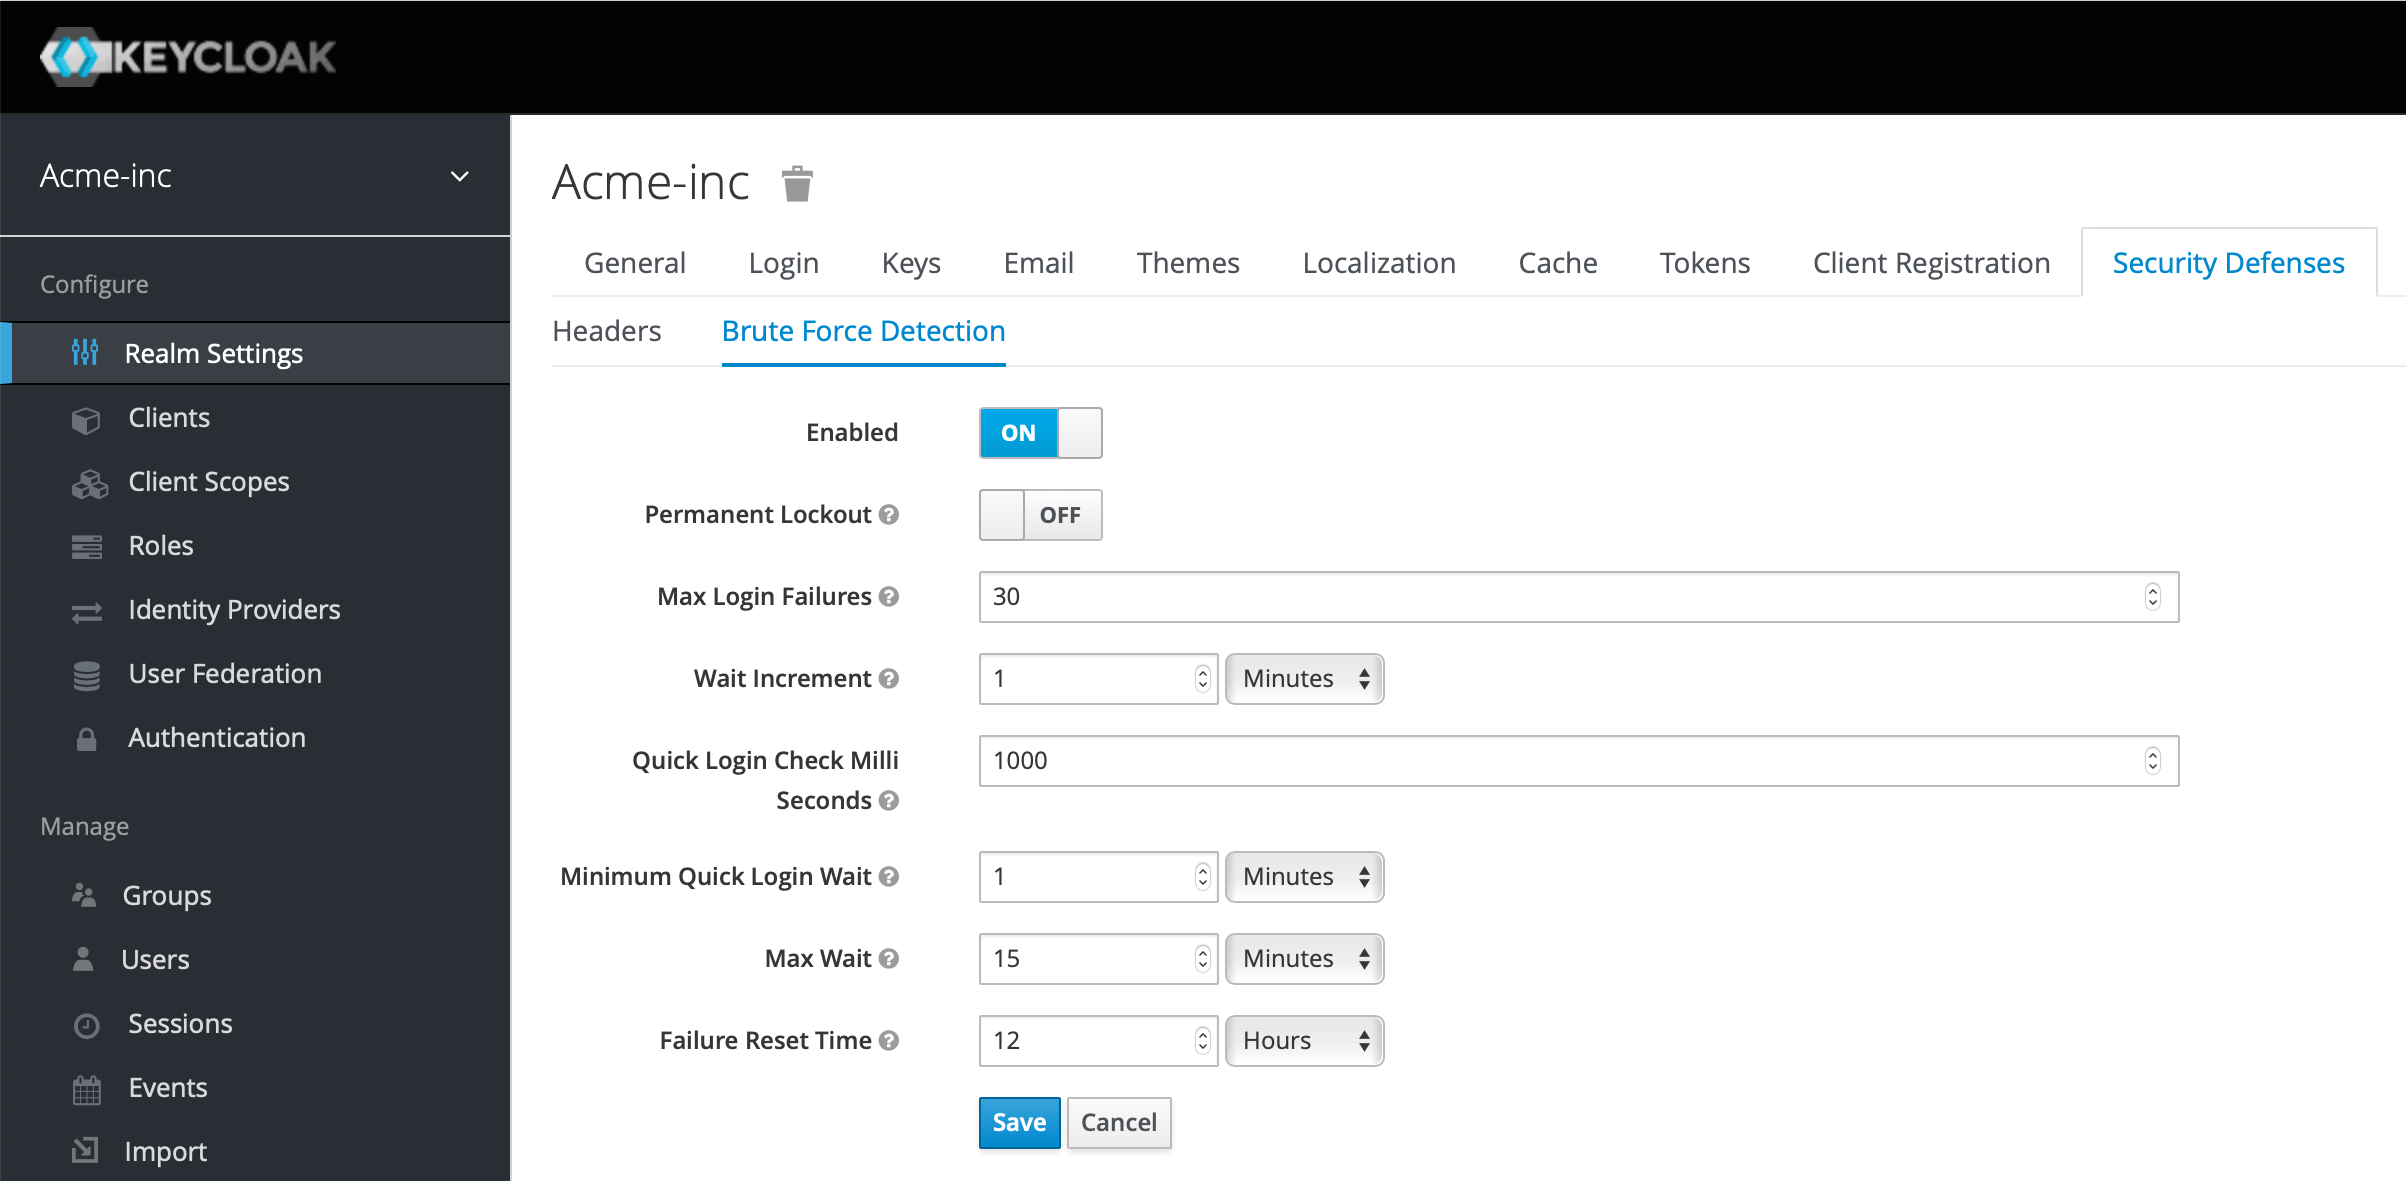
We had some issues with the email set up, which are detailed in the troubleshooting section at the bottom of this article. The final thing we're going to do at the realm level is on the Security Defenses and Brute Force Detection - seems like a good thing to turn on. Review the settings and adjust for your comfort level.
Setting Up A Client
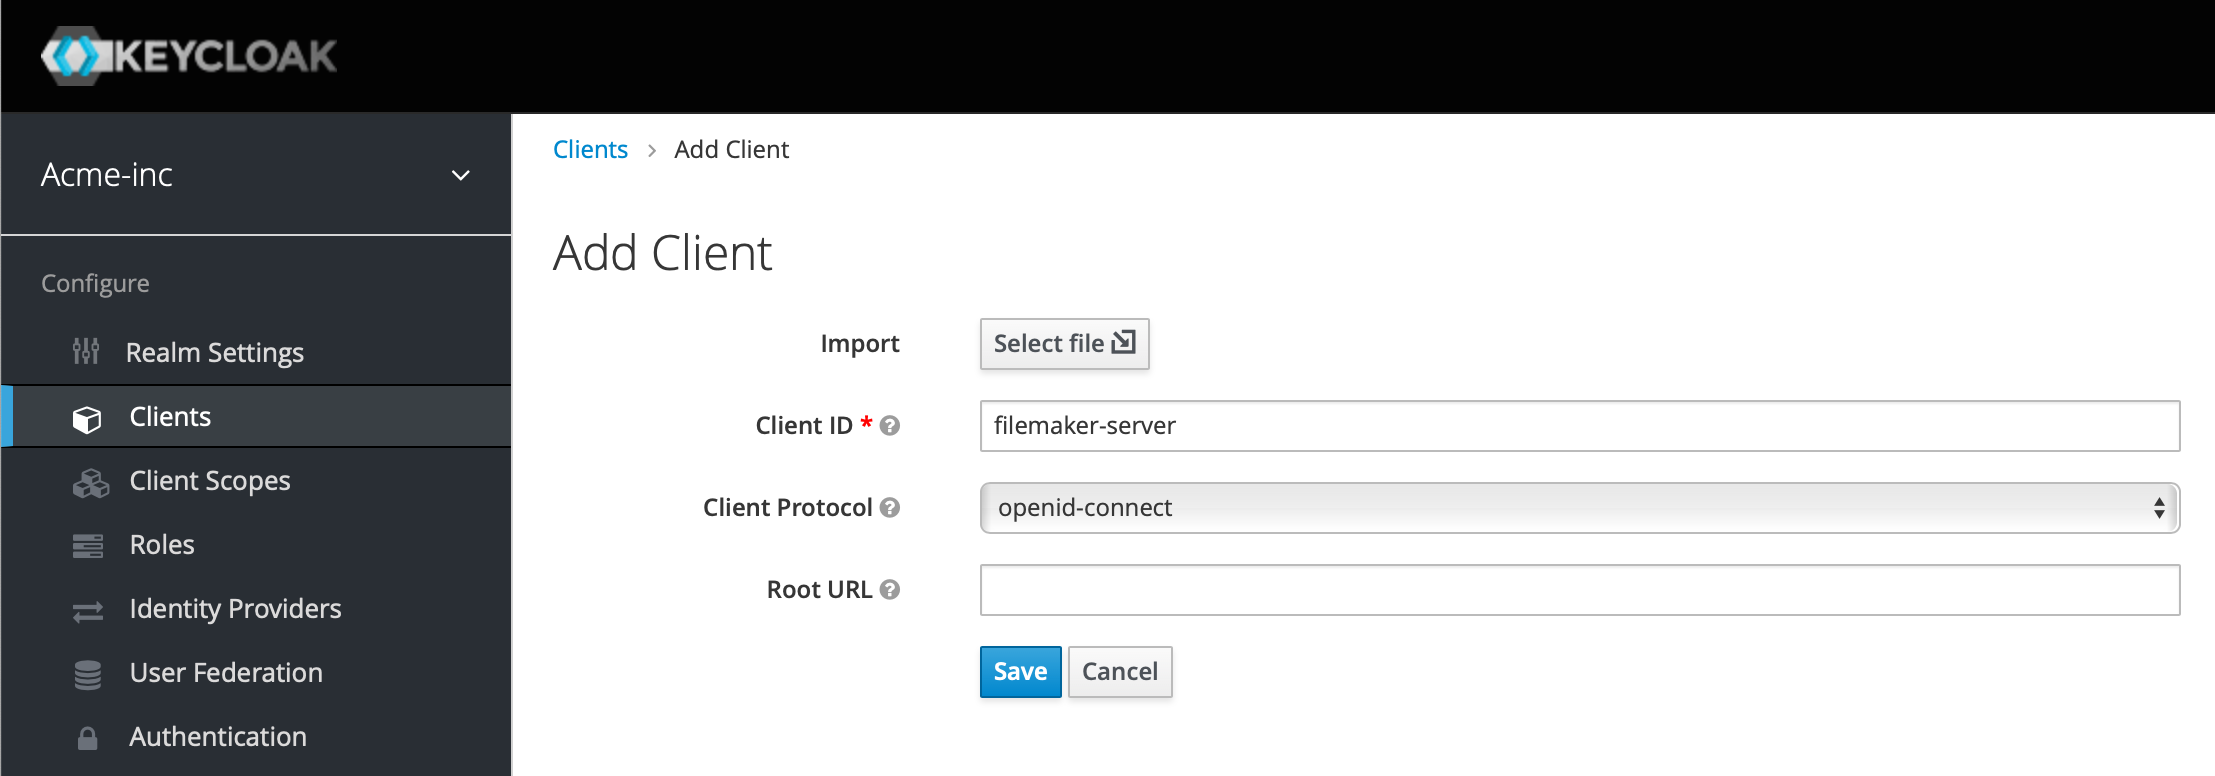
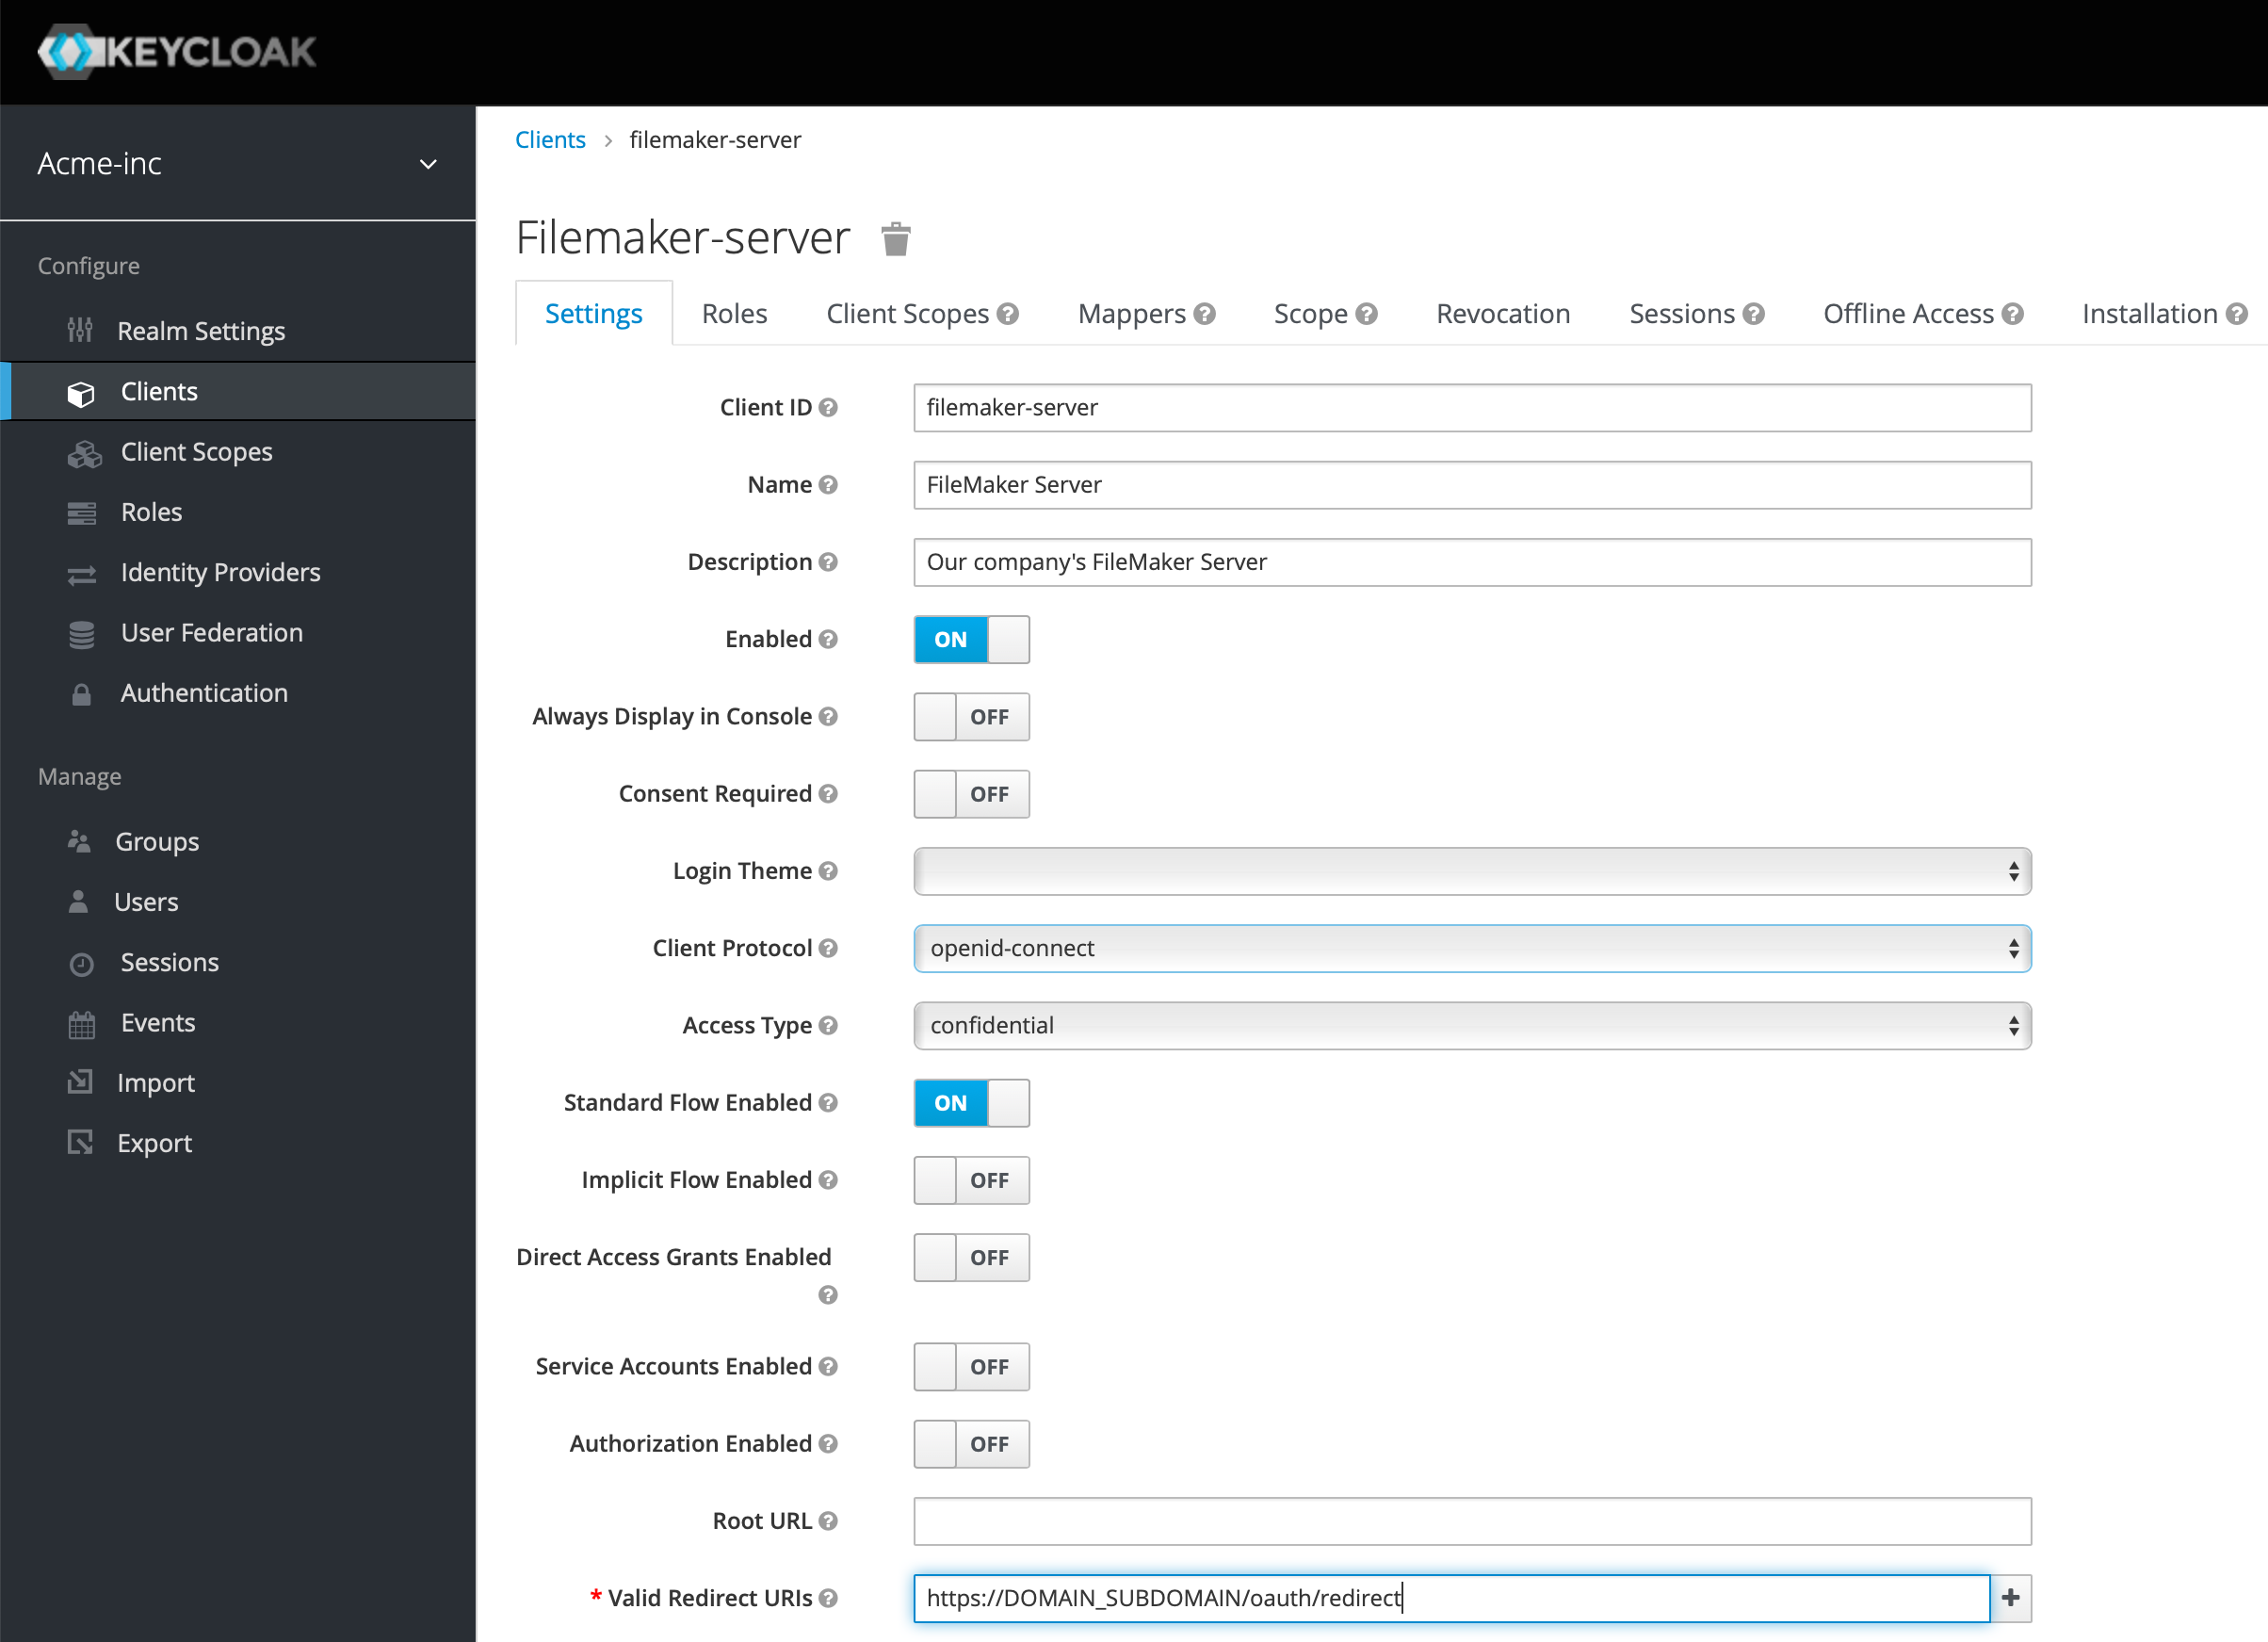
As per our definitions, a client is an application that is going to be authorized to use Keycloak, and for us this is FileMaker Server. So, on the left, under Realm Settings, click Clients and then click Create on the right above the list of existing clients. Enter a Client ID, again avoiding spaces or weird characters, and use openid-connect as the Client Protocol. Leave the Root URL value empty. Hit Save.
And holy smokes, this looks intimidating... But we'll walk through it. Add a Name and Description if you wish. Select "confidential" for the Access Type, turn off Direct Access Grants Enabled, and in the Valid Redirect URIs put https://FM_SERVER_DOMAIN/oauth/redirect - as always, switch out the placeholder for your domain name of your FileMaker server.
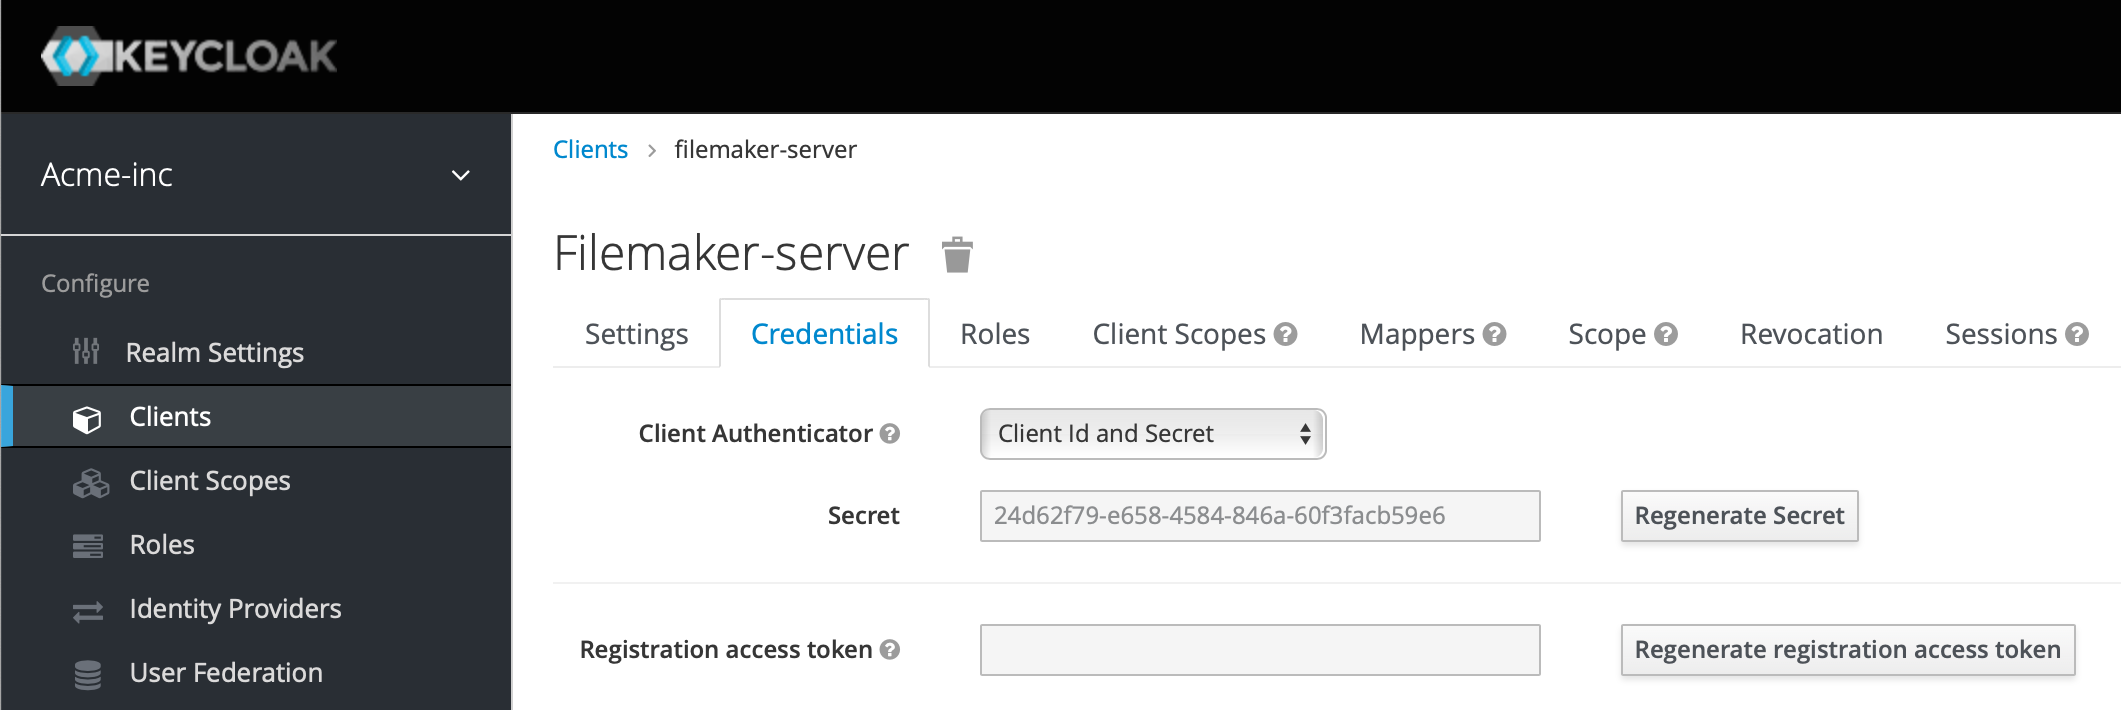
After you hit save, a new tab will appear called Credentials. While we're on the Settings tab, note the Client ID and on the Credentials tab note the Secret value - we'll need those later on.If your secret ever gets compromised, it's here that you can create a new one (as we have already done given the screenshot below!)
Setting Up Client Scopes
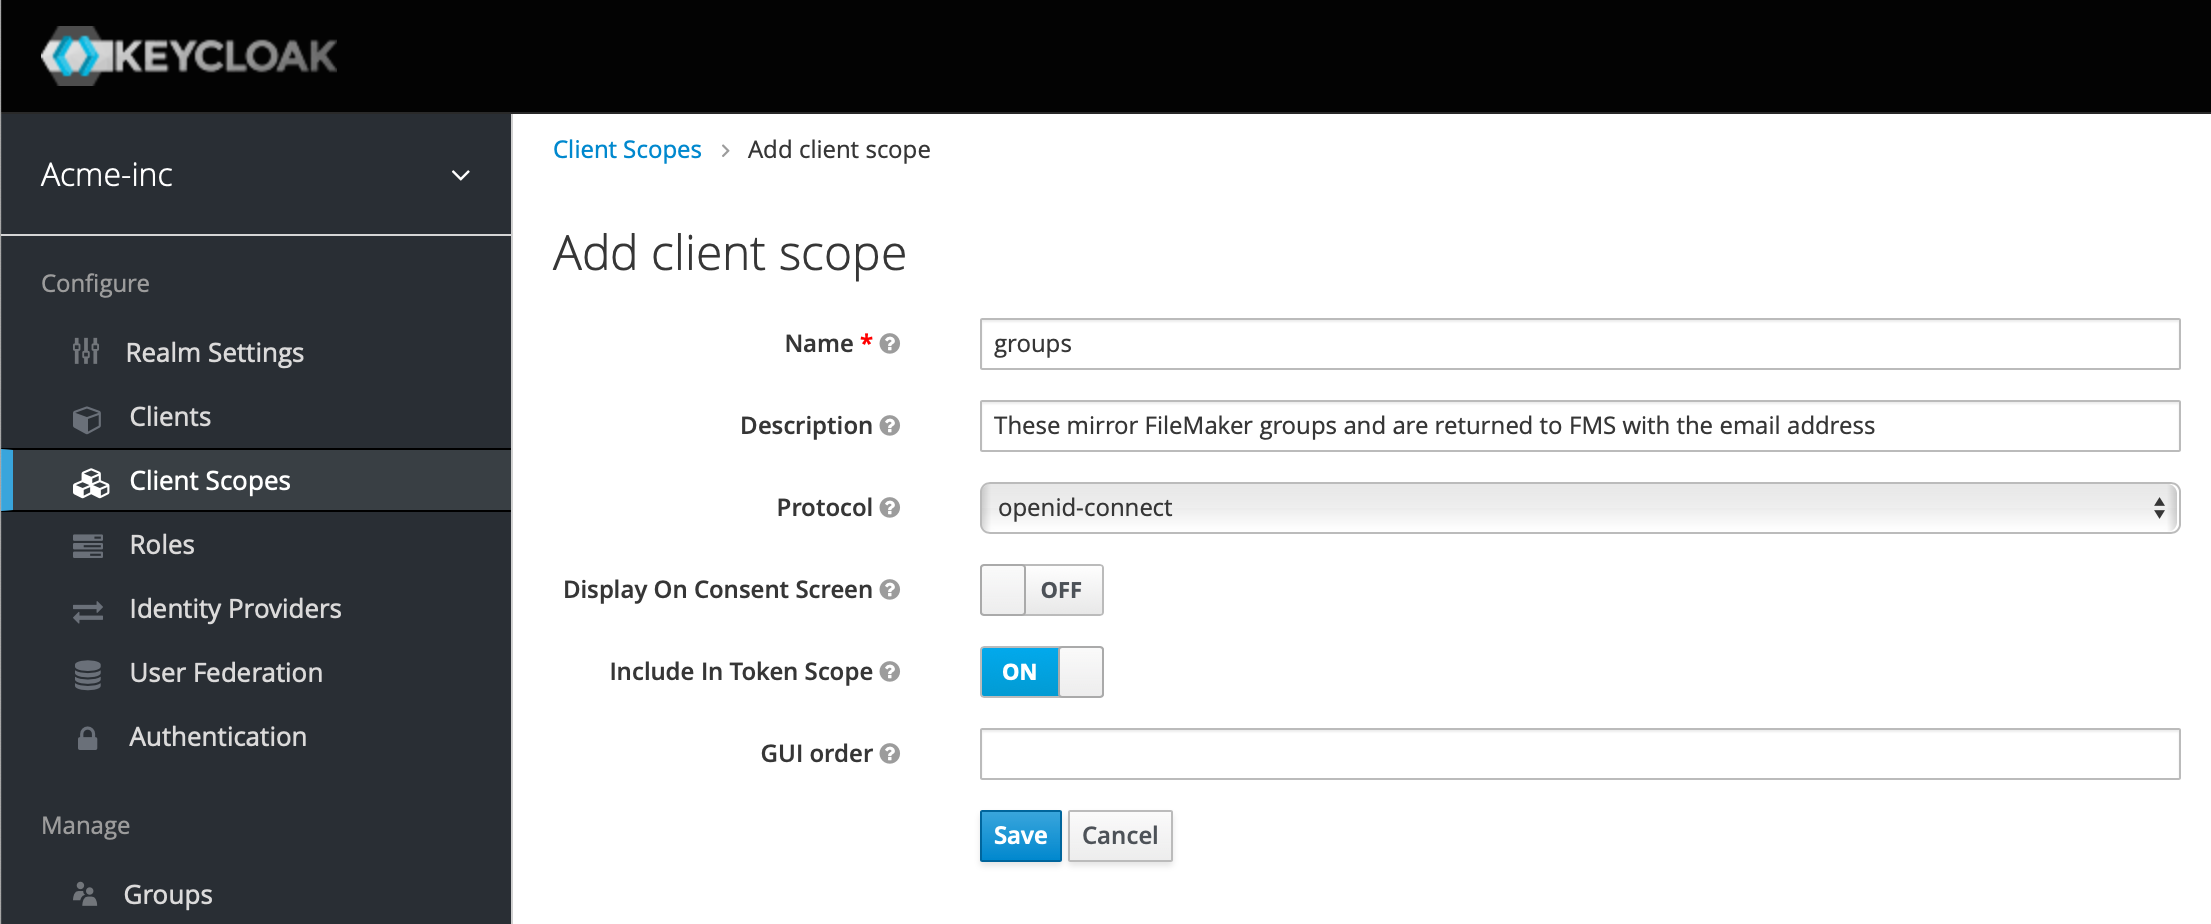
See the white paper for details on Client Scopes, but we're going to just dive in and make what we need. We're going to add a Client Scope called groups, and these will mirror the groups we set up in our FileMaker database. Click on Client Scopes in the left menu and then Create on the right. Add the name "groups", a description if you wish, ensure the Protocol is "openid-connect", turn off Display On Consent Screen, and ensure Include In Token Scope is turned on, as below:
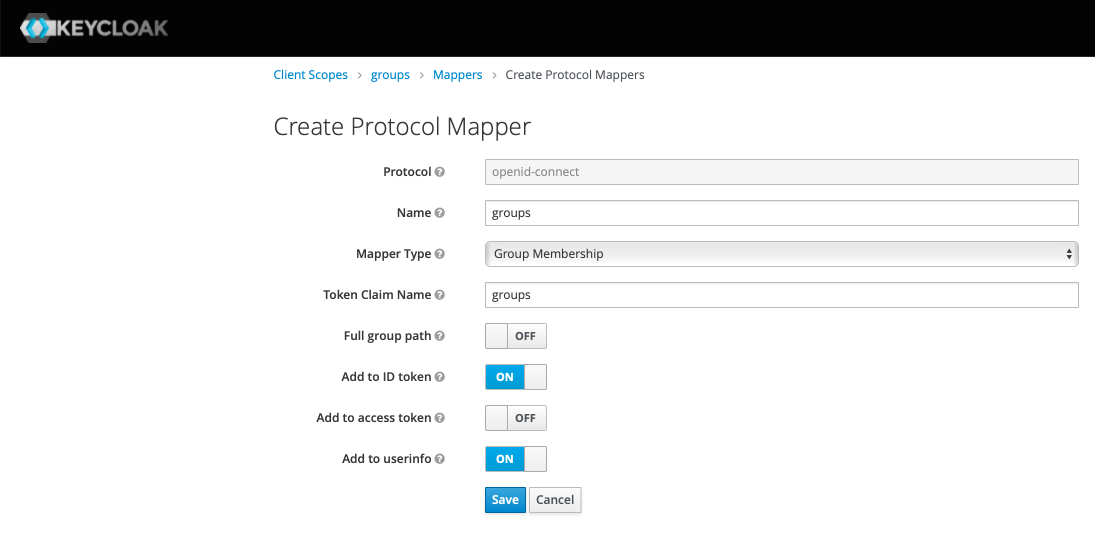
Click Save. Now click on the Mappers tab, and then Create on the right, add the name "groups", choose "Group Membership" for the Mapper Type, add "groups" for the Token Claim name, turn off the Full Group Path and Add To Access Token options. Hit Save and then use the breadcrumb menu at the top to get back to Client Scopes.
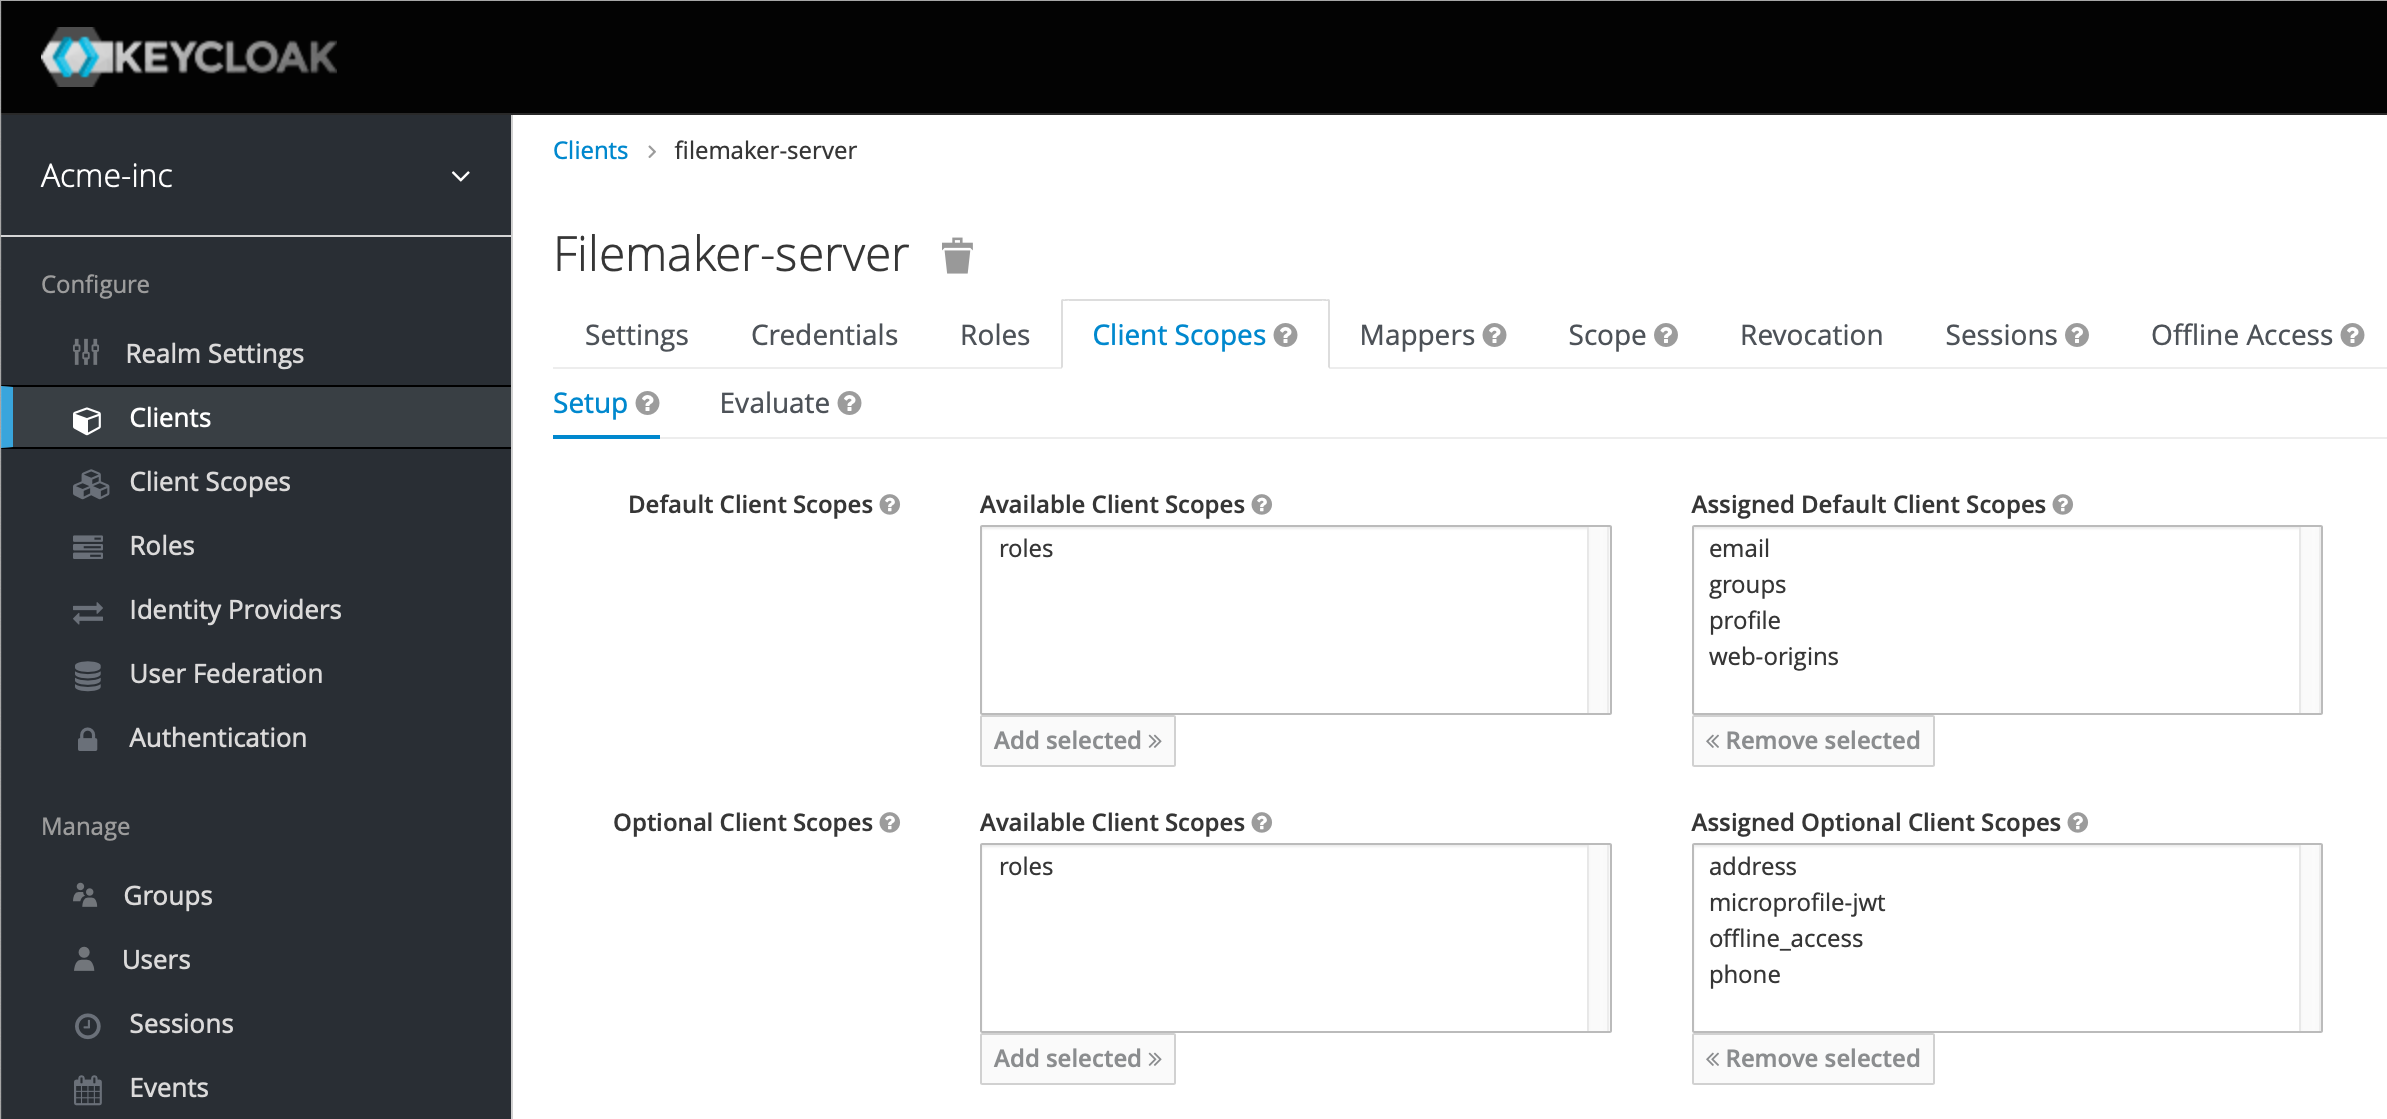
Finally for Client Scopes, we need to add our new scope to our client, so click Clients in the left menu, then click our filemaker-server client we made, and then the Client Scopes tab. We're going to select "groups" in the Default Client Scopes section and click Add Selected, and then select "roles" in the Assigned Default Client Scopes section and click Remove selected:
Setting Up Groups And Users
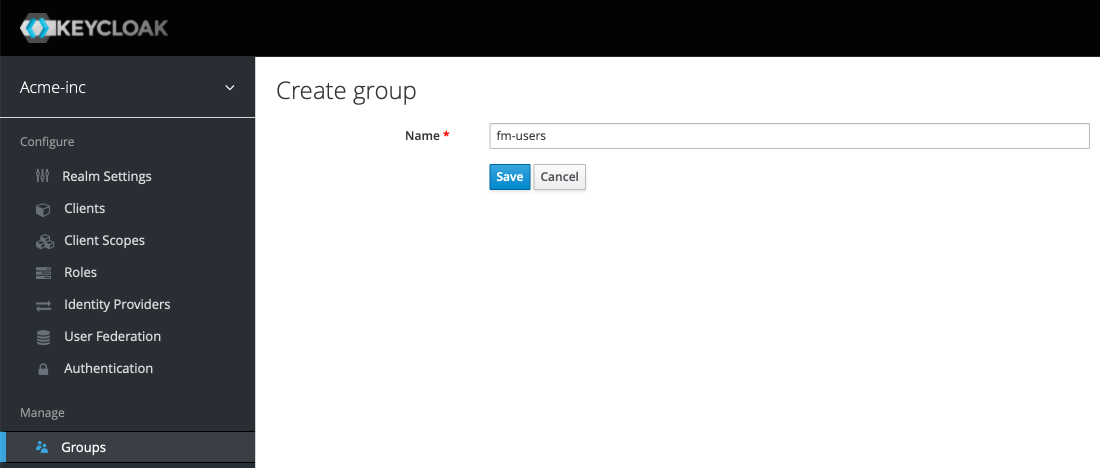
Moving on, we're going to set up our groups and our users. Click the Groups button from the left menu and then New from the upper right. Create two groups, one called "fm-users" and the other called "fm-administrators". After hitting save, you may have to use the breadcrumb menu again.
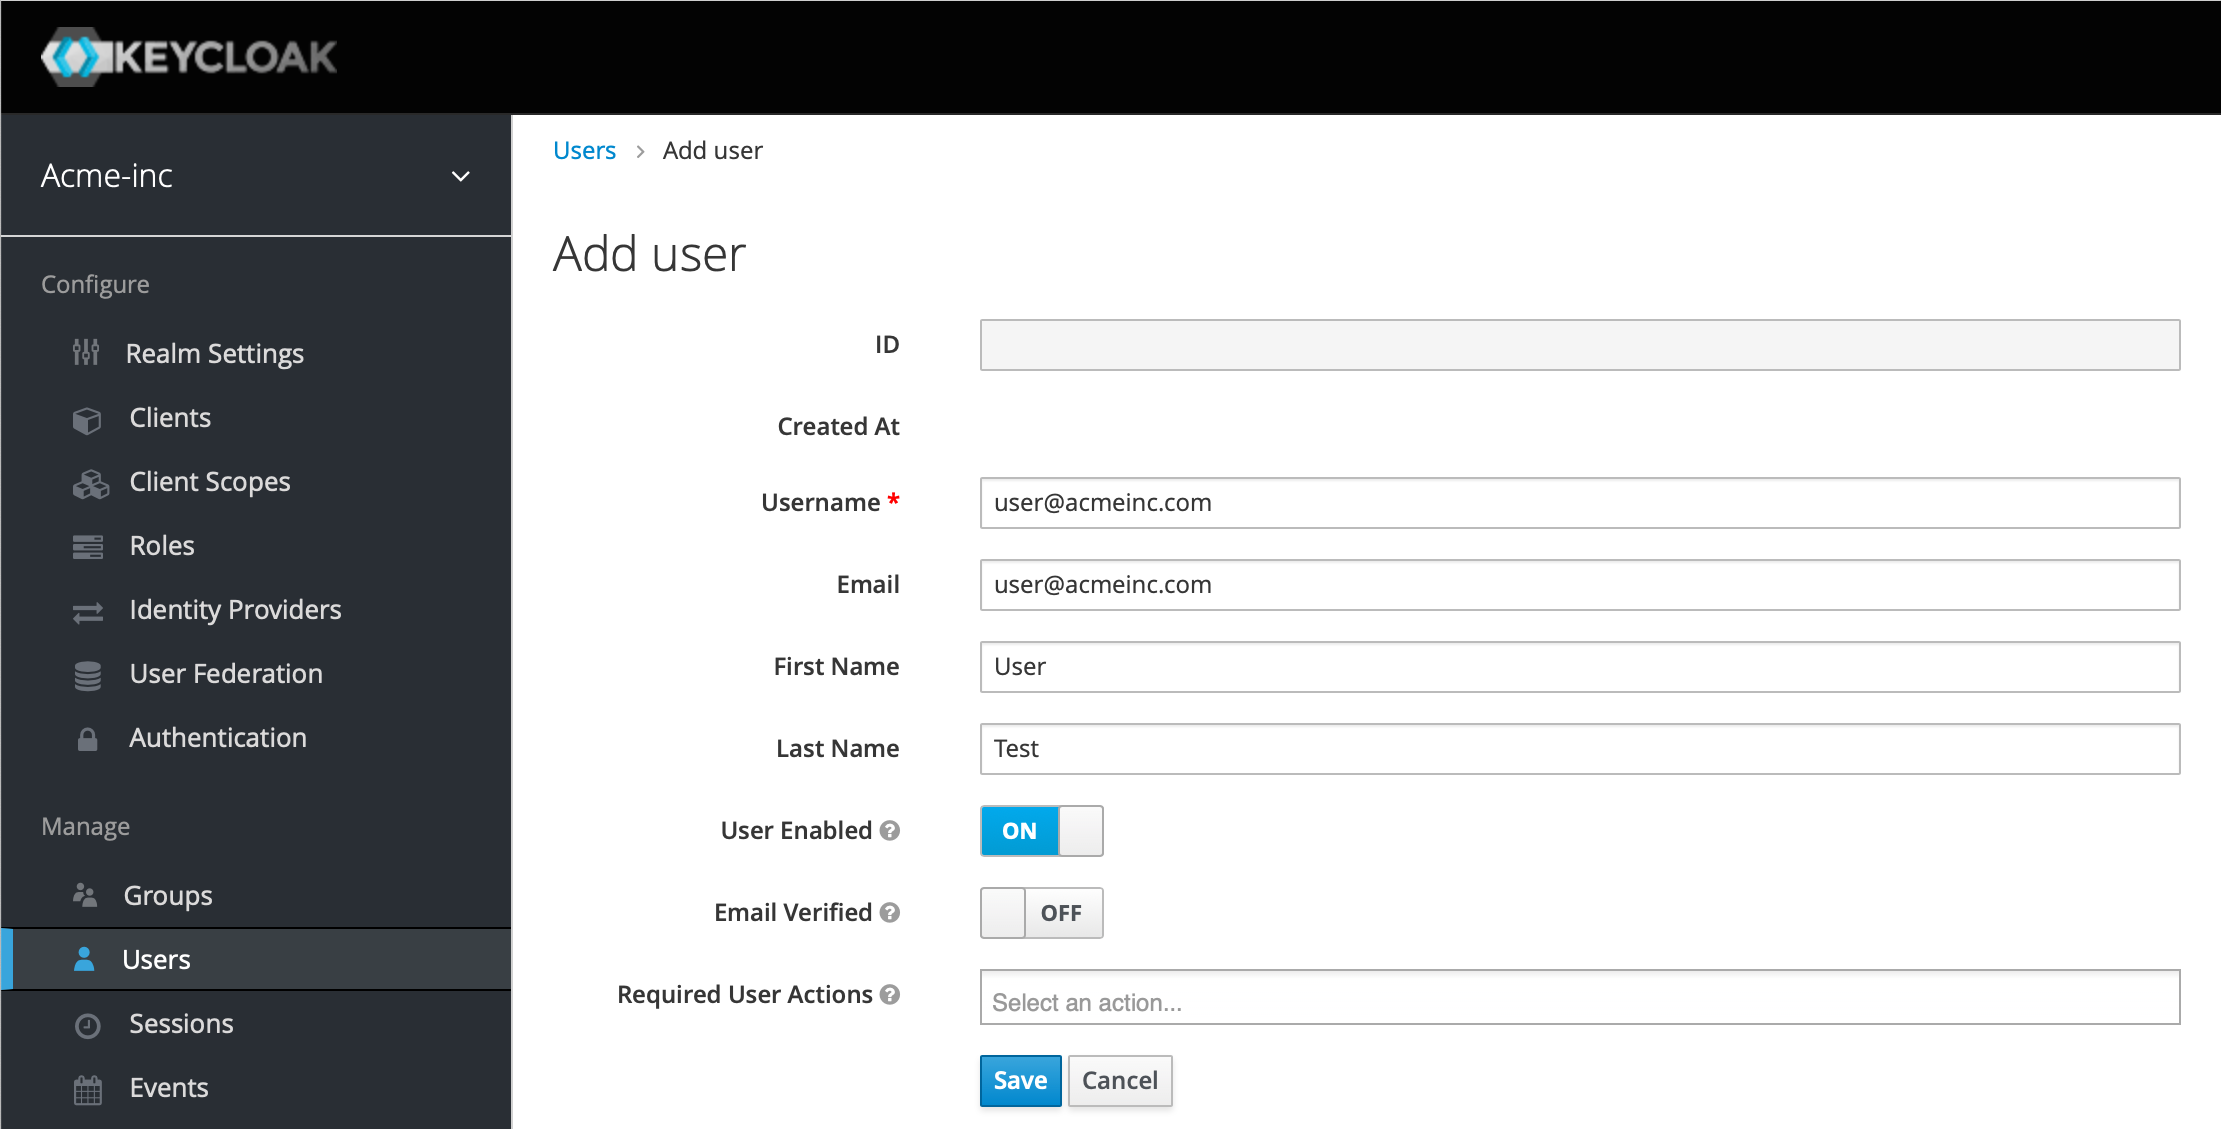
Now click Users in the left menu and Add User from the top right. We're going to use the person's email address as the username, but fill this out as you wish. We're not going to cover them now, but note the Required User Actions section and see if any of those actions make sense in your situation. Hit Save.
Now switch to the Credentials tab and make a password for the user - it's probably a good idea to leave the Temporary switch on so when the user first logs in they have to change their password.

Finally, click the Groups tab, select the "fm-users" group from the Available Groups list and then hit Join to add this user to that group. Do the same for an admin user, adding them to the "fm-administrators" group (and "fm-user" group if your FileMaker file dictates that they should be).
Troubleshooting
When setting up the realm email configuration, we received failure messages when testing the connection. If you get errors, of course first check that your details are correct and then type the following into the command line on the server to get at the logs and see what's up:
cd /opt/keycloak/current/standalone/log
cat server.log
Hit Ctrl-Z to exit that. In our instance, the email server was requesting to use TLSv1.1, which Keycloak is not configured to accept and so the connection failed. We're not sure why the email server was trying to use TLSv1.1 as it was configured to use TLSv1.2 but we could not find a solution and ended up using a different email provider.
Summary
We've done quite a bit of set up in Keycloak, a new realm, client (application), groups, users and more, and, while there's plenty more to explore in Keycloak, for now we're done on setting up what we need to here. Next, we need to configure FileMaker Server to authenticate using our Keycloak server and we'll cover that in our next article.


