

FileMaker Data API: A Beginner's Guide To Using PHP To Display Data On A Webpage
Extracting data from FileMaker for use on a webpage has been possible for years using various methods, including the PHP API. With the release of FileMaker 17, however, FileMaker introduced the Data API, allowing developers to interact with a database using industry standard REST methods. If you've never used the Data API before, you might be wondering how to get started. In this post, we're going to show you a very simple way of getting data from a FileMaker database, using the Data API and PHP.
Before we begin, please know that there are a variety of existing Data API frameworks that members of the FileMaker community have developed and made available. A list of them can be found here. (We'd like to send a shout out to Driftwood Interactive's fmPDA product, a replacement for FileMaker's API For PHP using the Data API, which can allow for a fairly simple switch from the PHP API to the Data API.)
With that said, if you're just starting out on the Data API road, or your integration is super simple and you just need to pull some data to show on a webpage, these frameworks might be daunting, too complex or just way more than is needed. So in this blog post, we're going to put together a simple PHP webpage that will pull data from a database and display it on the page.
Configuring The FileMaker Database
Before we get start building our PHP page, we need to configure our database to allow interaction using the Data API. Security is critical and we highly recommend you follow the suggestions laid out below.
- First, ensure the database you want to access is hosted on FileMaker Server and has a SSL certificate installed.
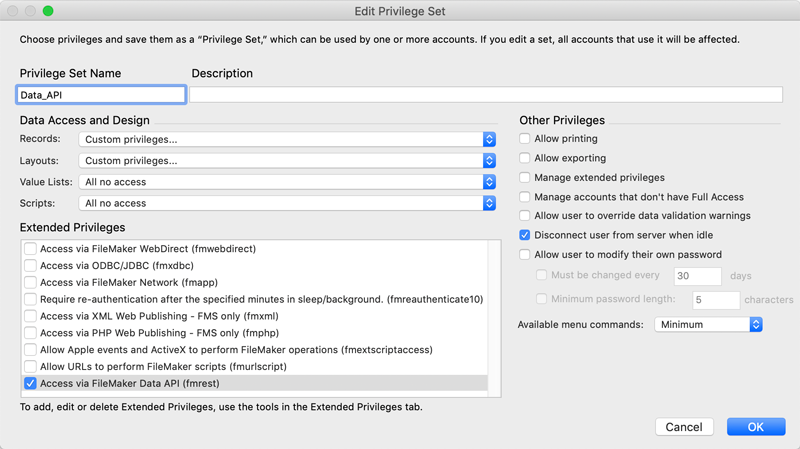
- Next, create a new privilege set within Manage > Security in FileMaker. Let's call it Data_API.
- Restrict this privilege set to the absolute minimum necessary, i.e. block access to unneeded tables, fields, scripts, layouts etc.
- In the Extended Privilege section, enable "Access via FileMaker Data API (fmrest)"
- Turn off almost everything else as below.
- Now create a new user account (data_api, for example) and assign the privilege set from above to this user.
- Use a complex password for this user account.
- Do not shortcut these configurations and under no circumstances should you use a full access accountI You have been warned!
- Finally, we'll need a layout specifically for the Data API to interact with. It doesn't need to look pretty but it does need to have the fields, and only those fields, that should be returned when we query the database. Let's call this Contacts_Data_API.
With all that done, our database is ready and we can move on to the fun stuff!
Setting Up The PHP File
We're going to build our PHP file piece by piece. We recommend using Visual Studio Code for this, but if you have your preferred code editor or like plain text editors, they will work too. Create a new blank file and save it with an appropriate name. In our instance, we've called it data-api-example.php. NOTE: This file needs to be hosted on a web server to work, so either upload it now and edit it from there, or build it out and upload it at the end.
We'll start by adding some of the basics to our file, including some html tags so we end up with a versatile file.
<!DOCTYPE html>
<html>
	<head>
		<meta name="viewport" content="initial-scale=1.0, user-scalable=no">
		<meta http-equiv="X-UA-Compatible" content="IE=edge">
		<meta charset="utf-8">
		<meta http-equiv="Content-Type" content="text/html; charset=iso-8859-1" />
		<title>Data API</title>
	</head>

	<body>
		<?php

		?>
	</body>

</html>
Note that in the body section we have our PHP tag, which is where the rest of our code is going to live.
Error Reporting
The first thing we're going to add to our PHP section are some lines to instruct the page to display errors if any occur. This can be useful while building the page as it will show what PHP errors have occurred and on what line. Once you've built the page, though, these lines can be commented out.
// Use the below three lines to show errors on the page
ini_set('display_errors', 1);
ini_set('display_startup_errors', 1);
error_reporting(E_ALL);
QUICK TIP: Lines must end with a semi-colon. If you find your page is not working, check all lines have semi-colons at the end of them.
Authorization Token Function
So, we're going to build out our page by setting up functions and then calling these functions at the end to actually run the code. We'll set variables that the functions will use when we call them. The first thing we need to do is get a token from the database that will then be used to make additional requests to get data. Copy and paste the code below to the error reporting lines as shown above.
// Function to get an authorization token which will be used to get data from the database - note, environment variables are set just before function is called
function get_token($host,$username,$password,$payloadName) {

	$additionalHeaders = '';
	$ch = curl_init($host);
	curl_setopt($ch, CURLOPT_HTTPHEADER, array('Content-Type: application/json', $additionalHeaders));
	curl_setopt($ch, CURLOPT_HEADER, 0);
	curl_setopt($ch, CURLOPT_USERPWD, $username . ":" . $password);
	curl_setopt($ch, CURLOPT_TIMEOUT, 30);
	curl_setopt($ch, CURLOPT_POST, 1);
	curl_setopt($ch, CURLOPT_POSTFIELDS, $payloadName);
	curl_setopt($ch, CURLOPT_RETURNTRANSFER, true);
	$result = curl_exec($ch); // Execute the cURL statement
	curl_close($ch); // Close the cURL connection

	// Decode the resulting JSON
	$json_token = json_decode($result, true);

	// Extract just the token value from the JSON result
	$token_received = $json_token['response']['token'];

	// Return the token from this function
	return($token_received);

};
Get Data Function
Our next function is the one that will use the token from above and make a request to the database for the query that we pass to it. Again there's nothing to adjust in this function; just copy and paste it below the token function from above.
// Function to get data from the database using the token from the function above - note, environment variables are set just before function is called
function get_data($host,$token,$payloadName) {

	$additionalHeaders = "Authorization: Bearer ".$token; // Prepare the authorisation token
	$ch = curl_init($host);
	curl_setopt($ch, CURLOPT_HTTPHEADER, array('Content-Type: application/json' , $additionalHeaders )); // Inject the token into the header
	curl_setopt($ch, CURLOPT_HEADER, 0);
	//curl_setopt($ch, CURLOPT_USERPWD, $username . ":" . $password); // We're using a token so no username/password is required
	curl_setopt($ch, CURLOPT_TIMEOUT, 30);
	curl_setopt($ch, CURLOPT_POST, 1); // Specify the request method as POST
	curl_setopt($ch, CURLOPT_POSTFIELDS, $payloadName); // Set the posted fields
	curl_setopt($ch, CURLOPT_RETURNTRANSFER, true);
	//curl_setopt($ch, CURLOPT_FOLLOWLOCATION, 1); // This will follow any redirects
	$result = curl_exec($ch); // Execute the cURL statement
	curl_close($ch); // Close the cURL connection

	// Decode the resulting JSON
	$json_data = json_decode($result);

	// Return the data from this function
	return $json_data;

};
Delete Token Function
Our final function takes our token and deletes it so it can't be used again. Tokens expire 15 minutes after the last time they were used but good practice would be to discard it once we're done with it. Again, copy and paste this below the last function.
// Function to delete the authorization token
function delete_token($host) {

    $additionalHeaders = '';
    $payloadName = '';
    $ch = curl_init($host);
    curl_setopt($ch, CURLOPT_HTTPHEADER, array('Content-Type: application/json', $additionalHeaders));
    curl_setopt($ch, CURLOPT_HEADER, 0);
    //curl_setopt($ch, CURLOPT_USERPWD, $username . ":" . $password);
    curl_setopt($ch, CURLOPT_TIMEOUT, 30);
    curl_setopt($ch, CURLOPT_CUSTOMREQUEST, "DELETE");
    curl_setopt($ch, CURLOPT_POSTFIELDS, $payloadName);
    curl_setopt($ch, CURLOPT_RETURNTRANSFER, true);
    $result = curl_exec($ch); // Execute the cURL statement
    curl_close($ch); // Close the cURL connection

    // Return the result
    return($result);

};
At this point, we have all our functions set up. You may have noticed that they look very similar to one another. It's possible that this code could be streamlined to have just one function that serves multiple purposes, but for the purposes of this tutorial, we wanted to make each section very clear so it can be examined by itself.
Get A Token
Now we can run our functions, which is where you will need to substitute your information into the code below. Copy this code and replace the sections that have square brackets with your own values, removing the square brackets in the process.
// Set up the environment variables to get a token
$host = '[server address, something like https://my.server.com]/fmi/data/v1/databases/[database name - avoid spaces]/sessions';
$username = '[username that was set up above]';
$password = '[password that was set up above]';
$payloadName = '';

// Call the get_token function and put the result into a variable for use in the get_data function
$token = get_token($host,$username,$password,$payloadName);
// To display the token on the webpage, enabled the line below
//echo $token;
Get The Data
This part is where we use the token we received previously and, in FileMaker terms, do a find on the special layout we set up, which will return the data for the fields on the layout for all records that match the find request. Again, for the $host variable, replace the square brackets sections with your information, and for the $payloadName variable, add the field and value you wish to search for. If you want to return all records, try searching for an asterisk (find anything) in your primary key field.
// Now that we have a token, set up the environment variables and call the get_data function to get the data
$host = '[server address, something like https://my.server.com]/fmi/data/v1/databases/[database name - avoid spaces]/layouts/[layout name as set up above]/_find';
$payloadName = '{"query": [{"[field name to be searched - do not include table prefix]": "[value to be searched for]"}]}';

// Call the get_data function
$request = get_data($host,$token,$payloadName);

// To show the raw data on the webpage, enable the line below
//var_dump($request);

// Extract a single field of data into a variable - this may need adjustment based on the circumstances
$data_retrieved = $request->response->data[0]->fieldData->{'[field name in returned data]'};
Delete The Token
Now that we've got our data, we can go ahead and delete the token.
// We're done with the token, so for security purposes, delete the token
$host = '[server address, something like https://my.server.com]/fmi/data/v1/databases/[database name - avoid spaces]/sessions/'.$token;

// Call the delete function
$token_deleted = delete_token($host);
// To view the result of this call, enable the line below
//echo($token_deleted);
And that's it! If you save this PHP file, put it on a web server and go to the address of this page. If all has been configured correctly you should have your FileMaker data displaying on the page. Click here to download the complete PHP file with some additional code that displays the returned data. Of course, next steps as to what you do with that data in terms of formatting, etc. will depend entirely on your circumstances. Hopefully, though, this tutorial provides a simple explanation and example of how you can get data from your FileMaker database to the web using the Data API.
As a next step, we highly recommend that you explore the Data API documentation released by FileMaker/Claris. Now that you know the basics and have built a working implementation, you can explore and build more complex integrations.
If you have any questions or need help with doing this, don't hesitate to reach out to us.


